bymilliepham.com is reader-supported and contains affiliate links. This means that if you click through and make a purchase, I may receive a small commission at no extra cost to you. Learn more.
I started working on Pinterest seriously less than a year ago. At first, nothing worked—my pins barely got seen, and I had no idea what I was doing wrong.
But over the last few months, things finally started to click. I changed the way I created content, researched keywords, planned my schedule, and tracked what worked.
That’s when I realized how much of a difference the right system can make.

Now my Pinterest stats are growing every month. If you’re in the same boat I was—trying to figure out how to schedule pins on Pinterest in a way that actually works—this is exactly what I do and how I do it.
This sets up the rest of your guide in a relatable, honest way and lets your results (like the ones shown in your analytics screenshot) speak for themselves.
My Favorite Method to Schedule Pins On Pinterest
I used to schedule pins using Pinterest’s native tool. But doing everything one by one took too long. Just five pins could take me 15 minutes.
I needed something FASTER.
That’s when I started using Post Planner. (Read my full review here)

Millie's Take
Post Planner makes social media simple. I can schedule posts in bulk, organize content into themes, and automatically reshare top posts. It saves time, keeps my feed consistent, and helps me focus on what works.
With Post Planner, I use two ways to upload pins in bulk. Each one works better for different situations.
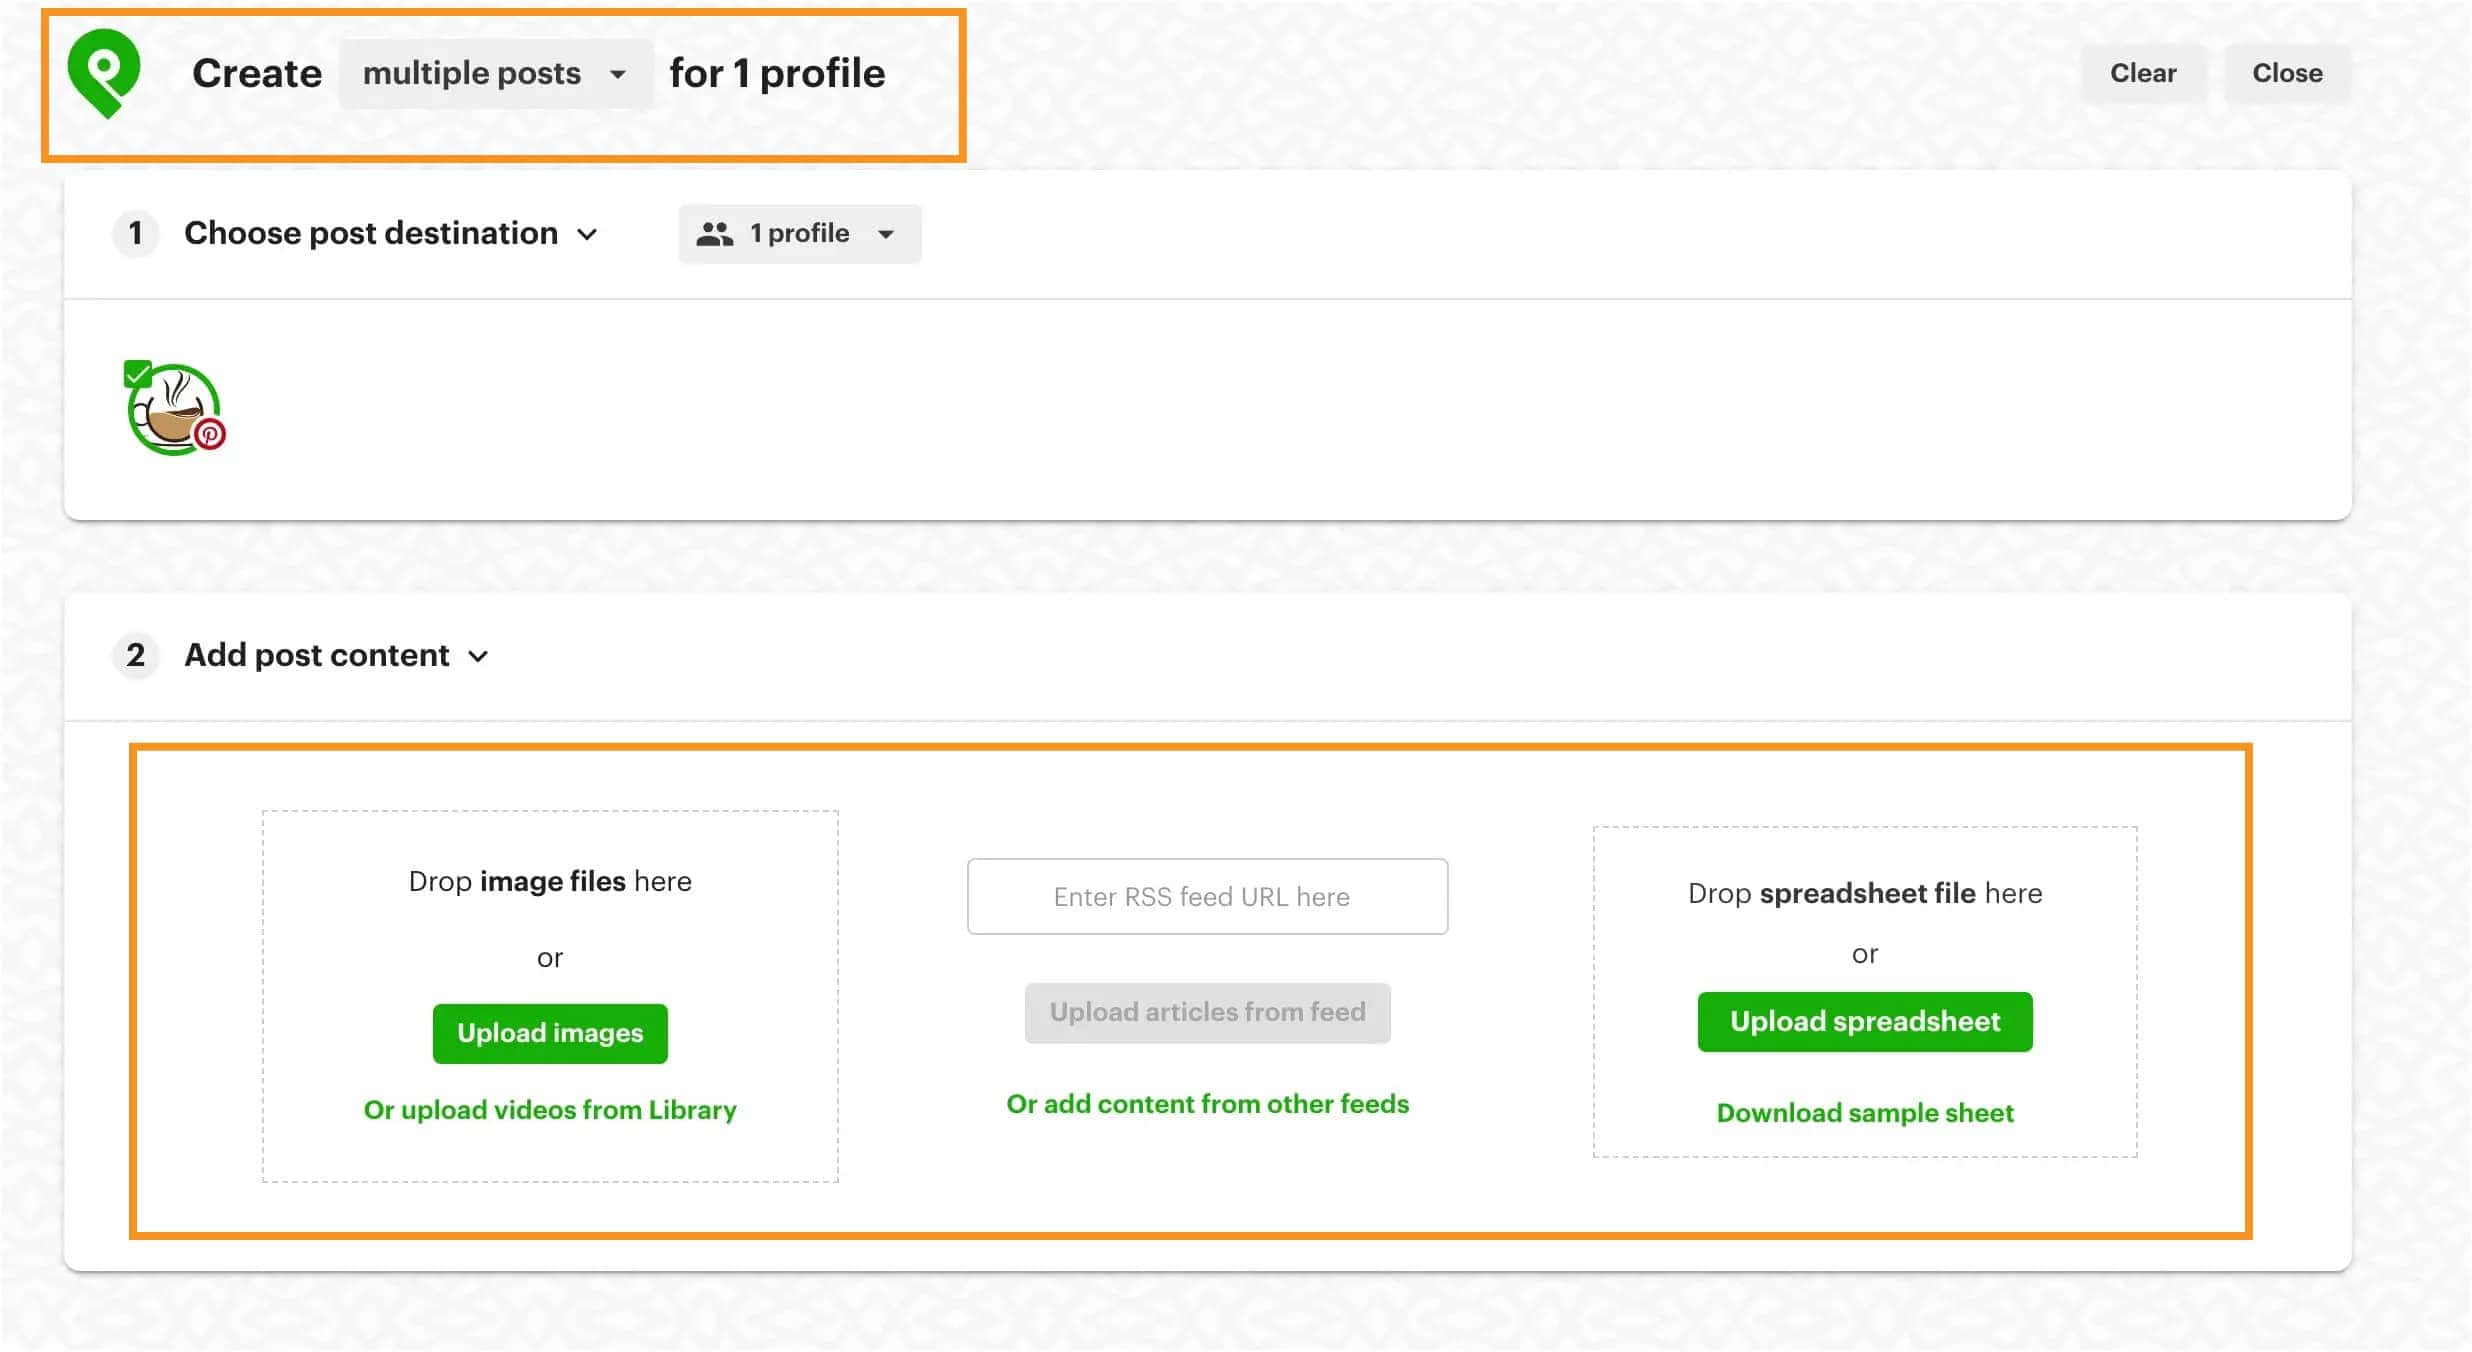
The first method is using a spreadsheet.
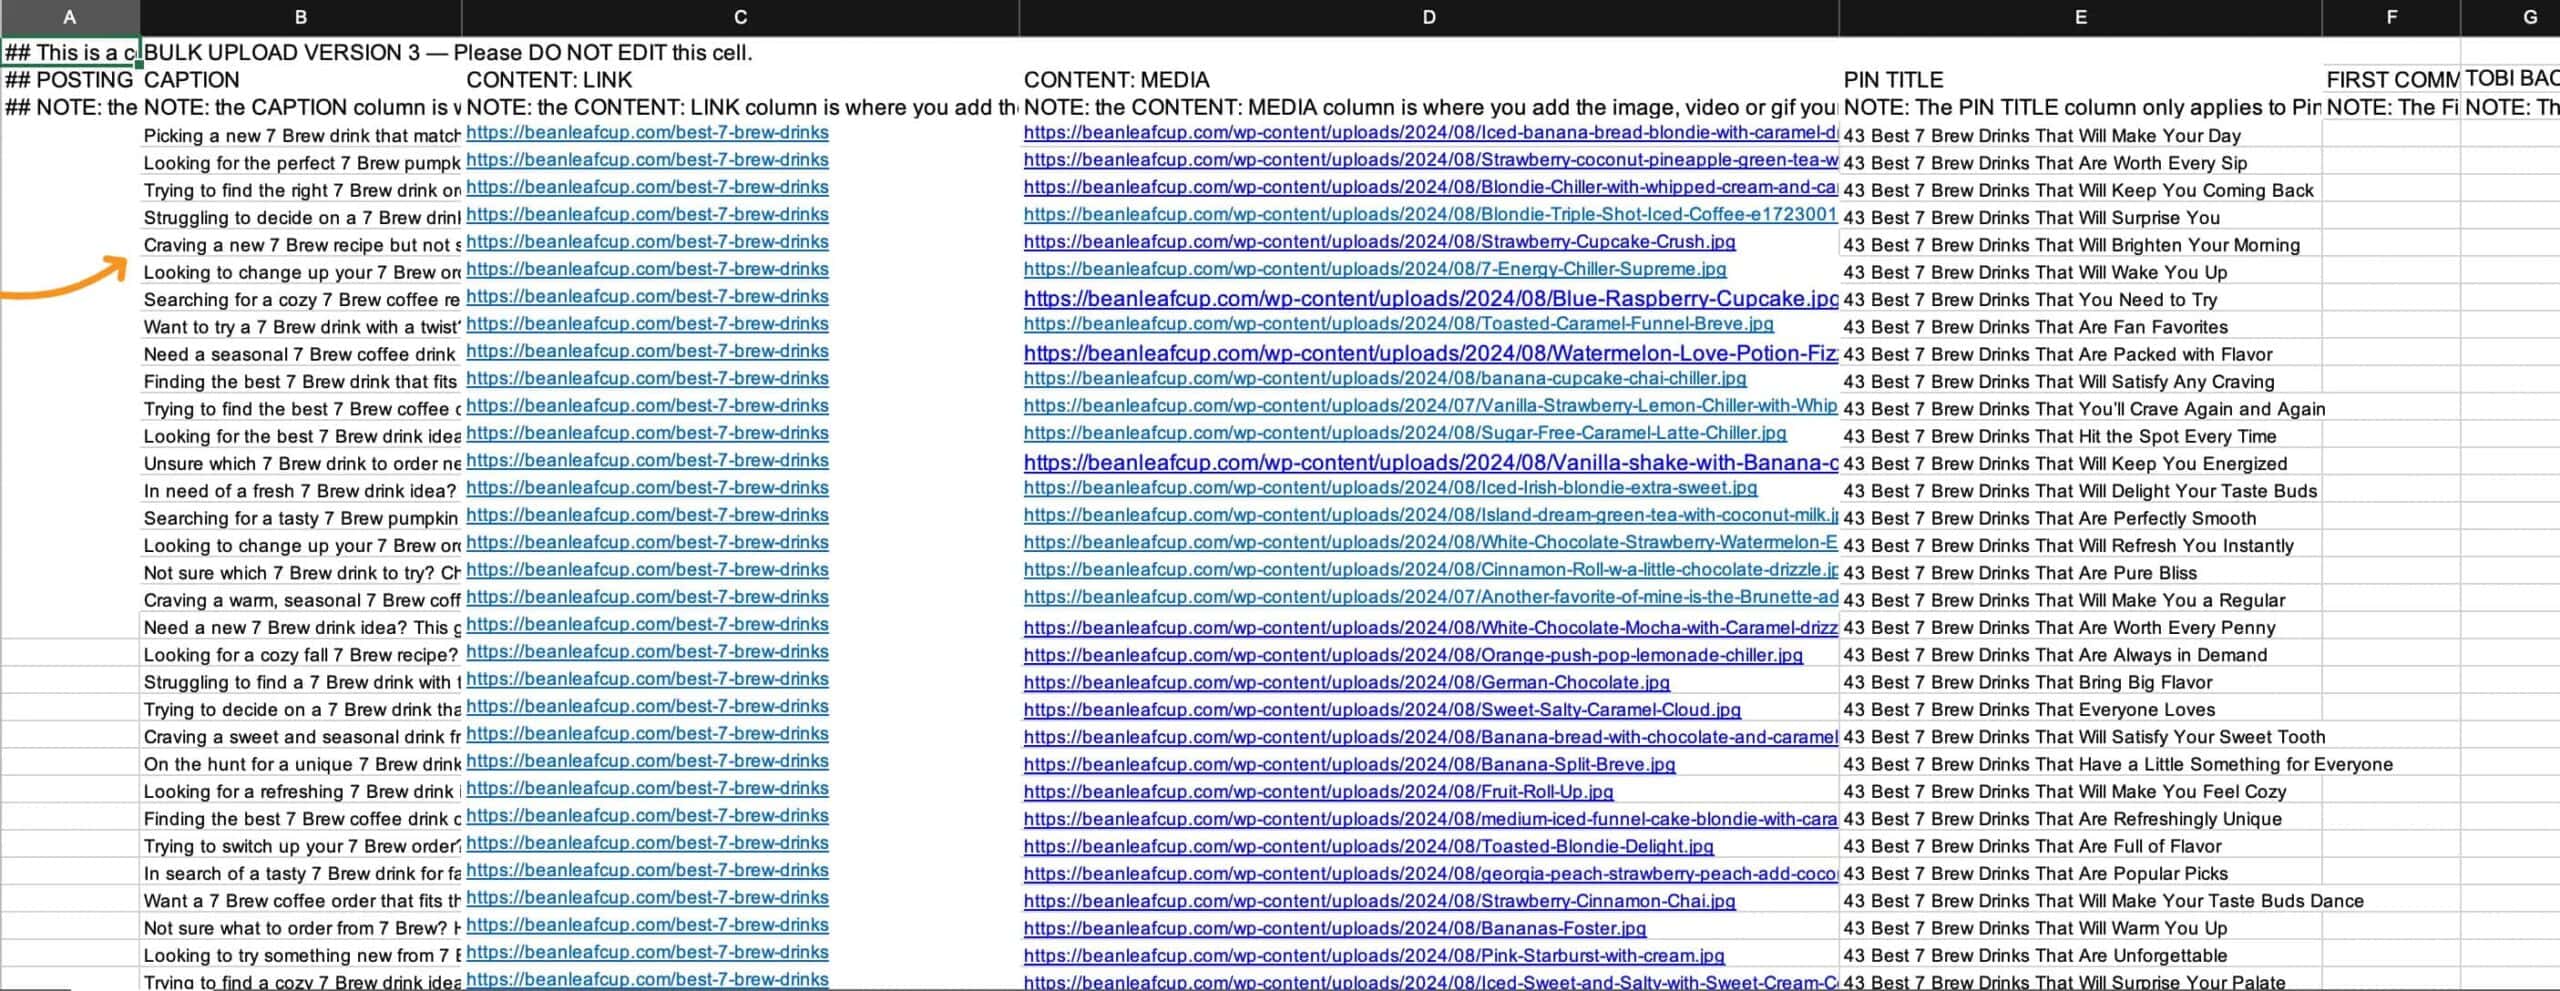
I list the pin title, image link, and destination URL in each row. Then I upload the file.
This works best when I already have everything prepared and want to schedule a full batch of pins from one blog post.
The second method is uploading multiple images at once from my computer.
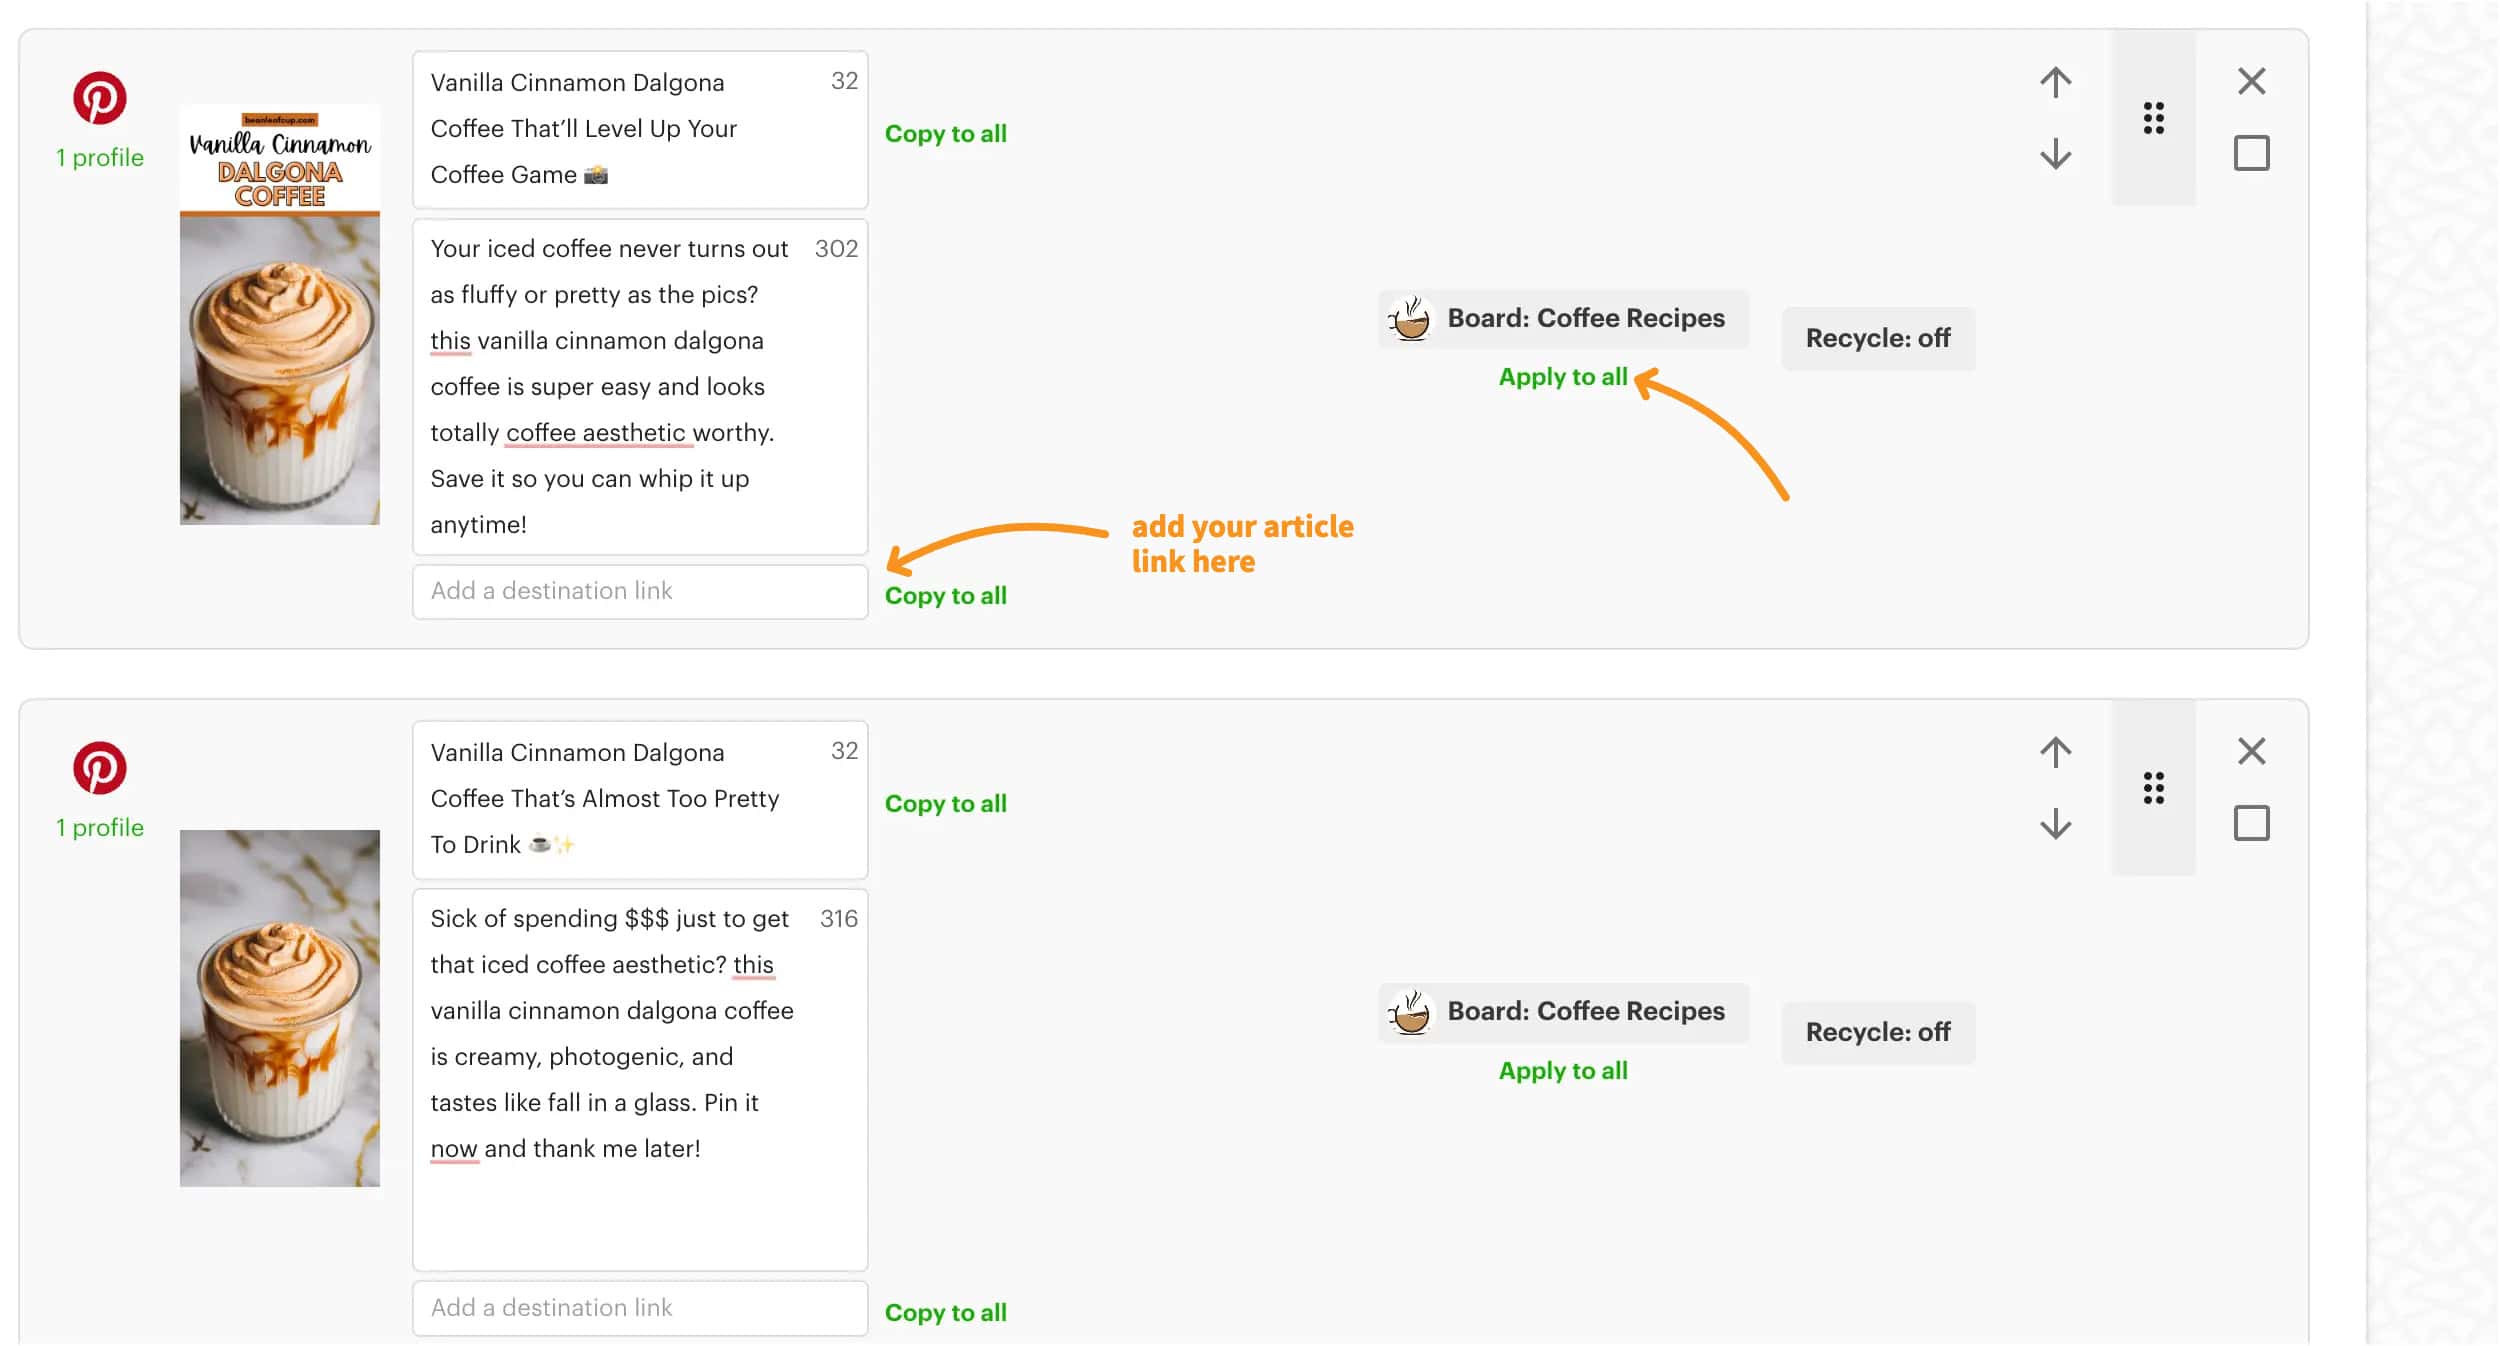
After they upload, I manually add the title and pin description. I use this when I design my own pins and only have 7–10 to upload.
It’s simpler, and I don’t need to use a spreadsheet for that small number.
Post Planner lets me set the same board for all pins in one step. That’s helpful when I’m pinning several graphics from the same post.
There’s also a shuffle option, which mixes the order of the pins before they go live. It prevents the same content from showing up back-to-back, so the board feels more balanced.

Post Planner also supports multiple Pinterest accounts. Each one can have its own plan and queue. If you manage more than one blog or client, it helps keep things organized without switching tools.
How Often I Schedule Pins (And How Many Per Post)
For each blog post, I make at least five different pins. Sometimes more. I like using different styles, headlines, or layouts to see which ones get more saves or clicks.
I don’t stick to a set number of pins per day. It depends on how much content I’ve prepped and what’s in my queue. Some weeks are lighter, some are full.
Using Post Planner helps me space out my pins without guessing. I can set a schedule and let it post at the right times.
This method helps me stay consistent without spending time every day. It also gives each blog post more chances to reach the right audience.
How to Schedule Pins Using Pinterest's Native Scheduler
Pinterest has a built-in tool that lets you schedule pins directly from your account. It’s free to use and works well if you’re posting just a few pins at a time.
You don’t need any extra software. But there are a few things to know to make the most of it.
Where to Find the Scheduler
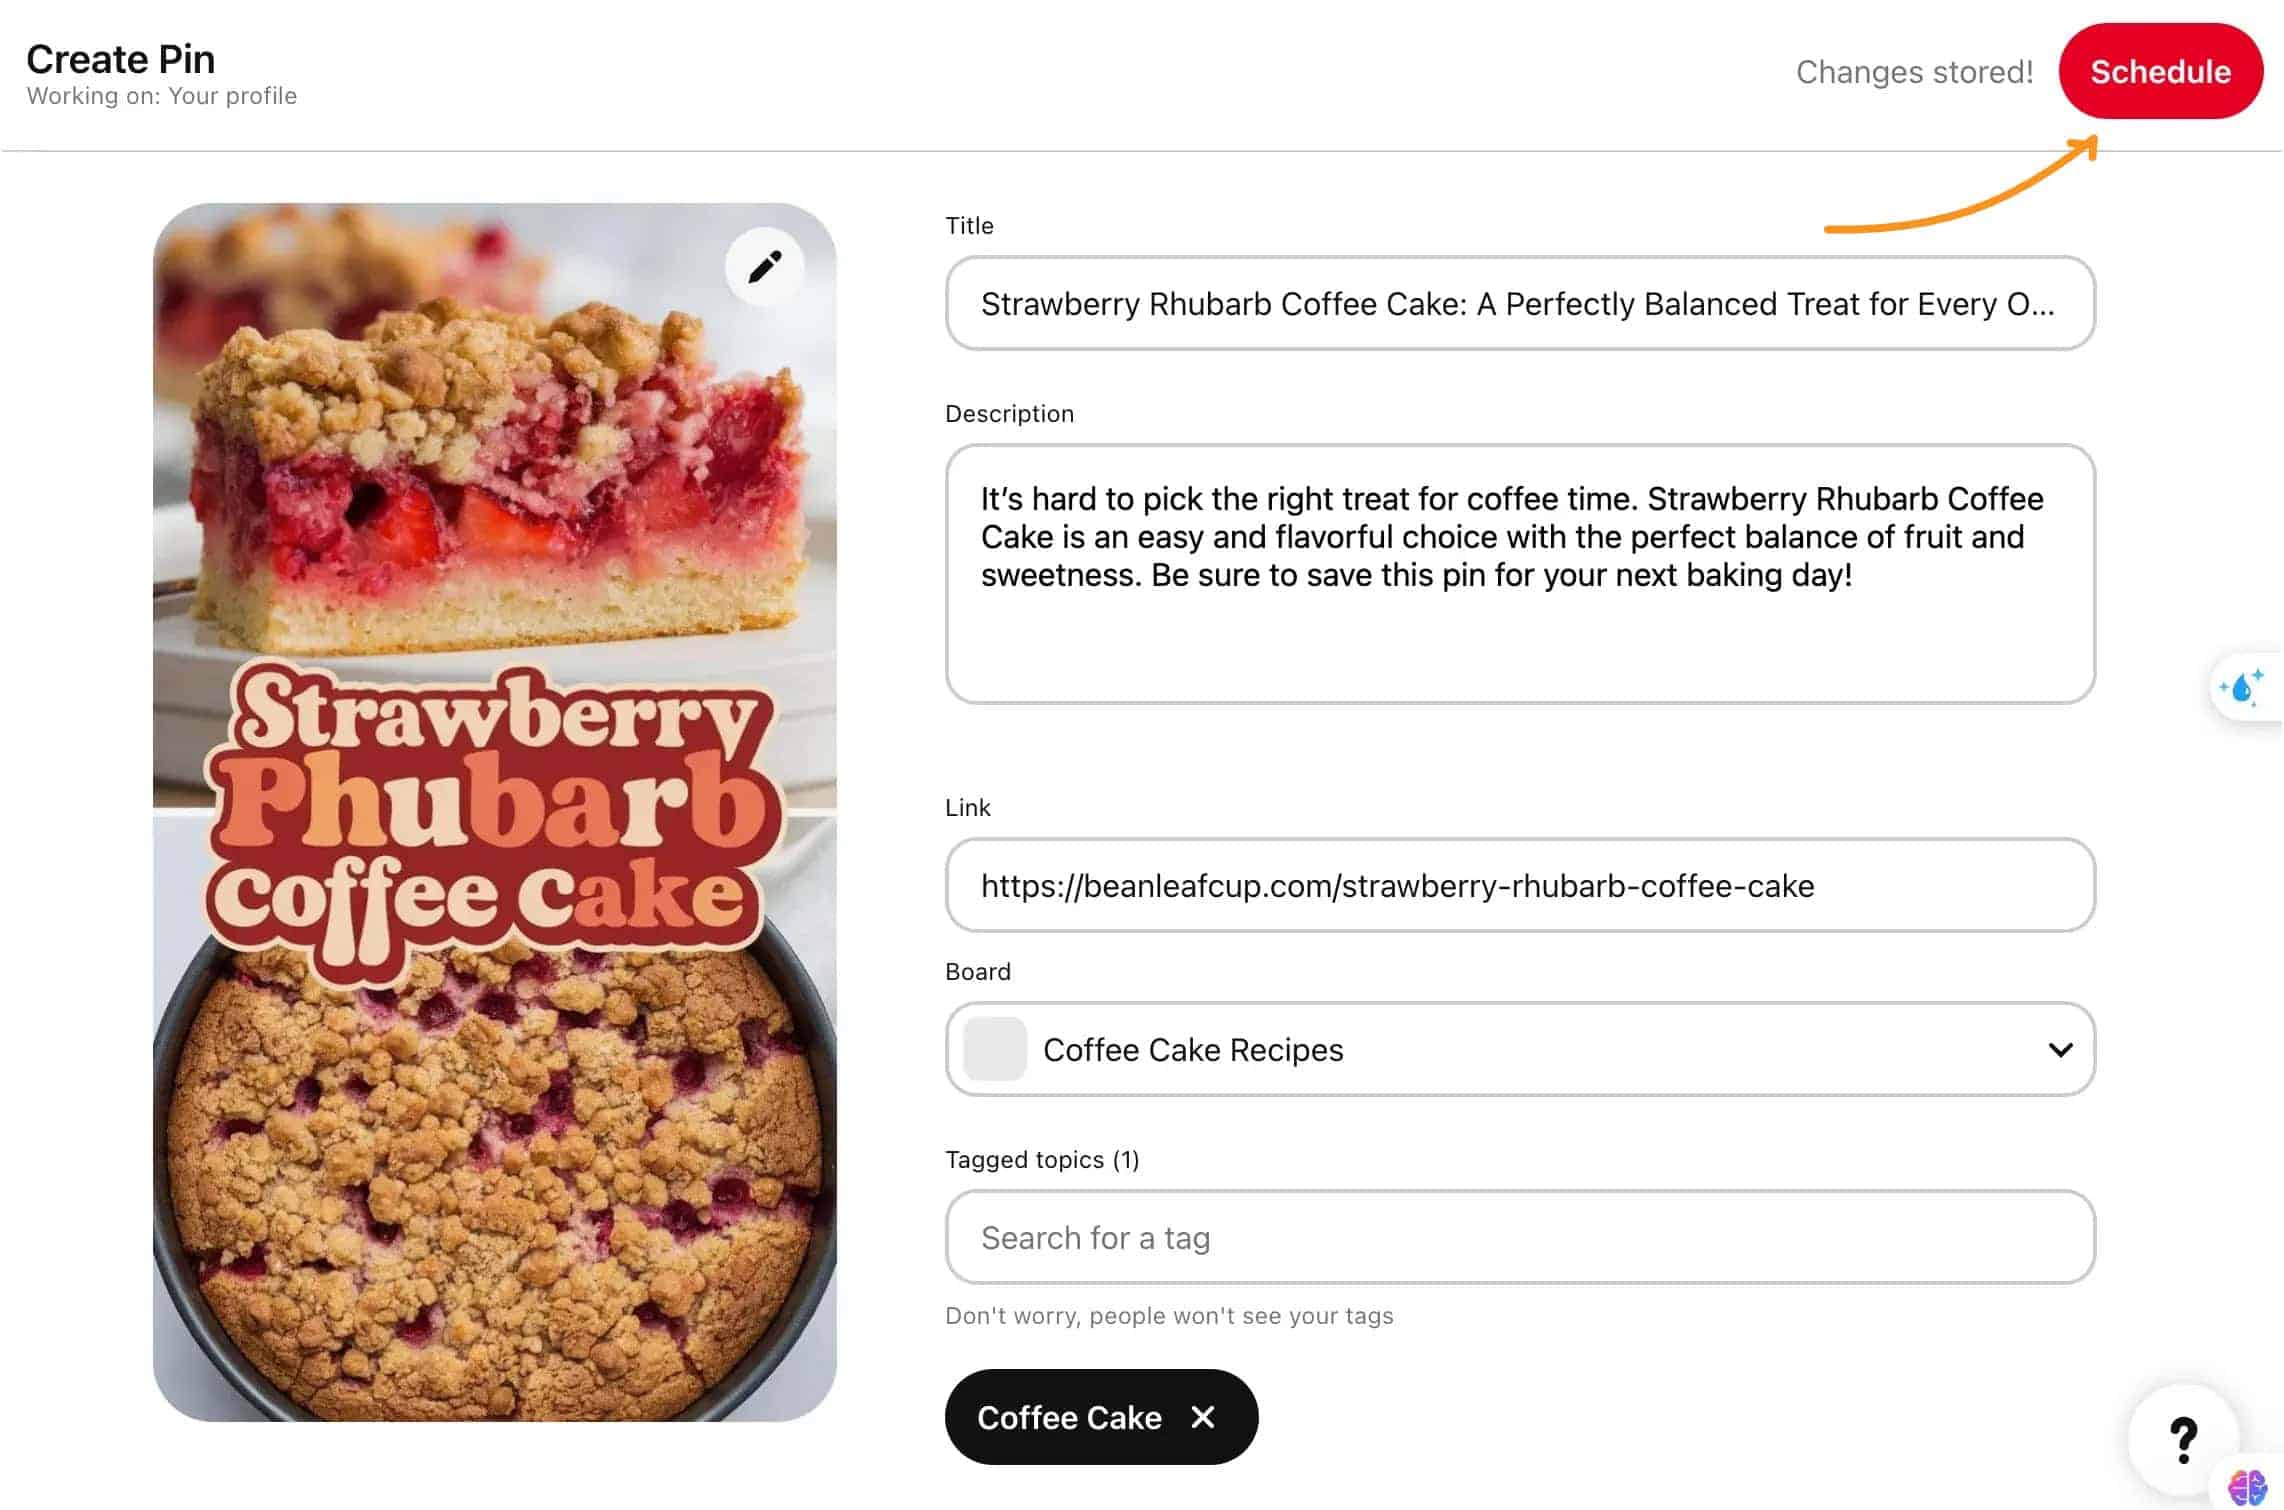
Here’s how I usually do it:
- Go to your Pinterest profile and click Create Pin
- Upload your image
- Add your pin title, description, and destination link
- Choose a board
- Scroll down and select “Publish at a later date”
- Pick the date and time
- Click Schedule
That’s it. Your pin will go live at the time you picked.
Things to Keep in Mind
You can only schedule up to 100 pins at a time using Pinterest’s native tool.
It also lets you schedule pins up to 30 days in advance.
Once scheduled, your pins show up in the “Created” tab under your profile.
You can’t edit the image or video once it’s scheduled—only the text.
If you're posting a few times a week, this tool is enough. But if you need to schedule a larger batch of pins or want more control, you may want to look into third-party tools like Post Planner.
How I Use This Tool
I mostly use Pinterest’s native scheduler for list-style blog posts. These are roundup-style posts like “10 Easter Appetizers” or “15 Summer Decor Ideas.”
I space out these pins 7 days apart to avoid crowding the feed. But if I’m getting close to a seasonal date—like Easter—I’ll shorten the gap to every 3 days so they go out in time.
This helps me stay relevant without needing another app.
How I Choose Which Board to Pin To
When it comes to choosing boards, I keep it simple. I pin all the pins from one article to the same board.
Each blog post usually fits one main board—for example, “Dalgona Coffee Recipes ” or “Eggnog Drink Recipes.” I don’t spread the same pin across multiple boards.
I’ve found that keeping all related pins in one place makes it easier to manage and keeps the board focused.
This also helps when I go back to check performance or re-pin older content. Everything is already grouped where it belongs.
If you’re just starting out, pick the most relevant board for your content and stick with it—usually 2 to 3 boards is enough.
Don’t worry about pinning the same graphic to every possible board. Focus on quality over quantity—and save time in the process.
Final Thoug
Learning how to schedule pins on Pinterest takes some trial and error, but once you find a system that fits, it gets easier to stay consistent.
Whether you use Pinterest’s native scheduler or a tool like Post Planner, the key is to keep things simple and organized.
Don’t worry about doing it perfectly—just focus on building a routine that saves you time and helps your content show up for the right audience.
