bymilliepham.com is reader-supported and contains affiliate links. This means that if you click through and make a purchase, I may receive a small commission at no extra cost to you. Learn more.
I know you've heard about Jasper AI (My review here), and you've even tinkered with it, curious about its capabilities.
But when it comes to actually writing a blog post with Jasper, you might be wondering, "Where do I even start?"
You're not alone in this. Even with powerful tools at our fingertips, the process can feel daunting.
Consider this: a staggering 77% of internet users read blogs, according to ImpactPlus [1]. That's a lot of potential eyes on your content, and the pressure to stand out is real.
In this article, I'll break down the process into simple, actionable steps.
By the end, you'll not only know how to write blog post with Jasper AI to create high-quality content faster, but you'll do it with the confidence of a seasoned blogger.

Jasper AI Review Summary
Jasper is a powerful writing tool that learns your unique voice, helping you create personalized content quickly and effectively.
It offers a variety of templates and a browser extension that makes writing accessible wherever you are online.
Whether you're drafting emails, blog posts, or social media updates, Jasper enhances your writing process, saving you time and boosting your productivity.
11 Steps To Write Blog Post With Jasper AI
1. Choose a Jasper AI Plan That Works For You
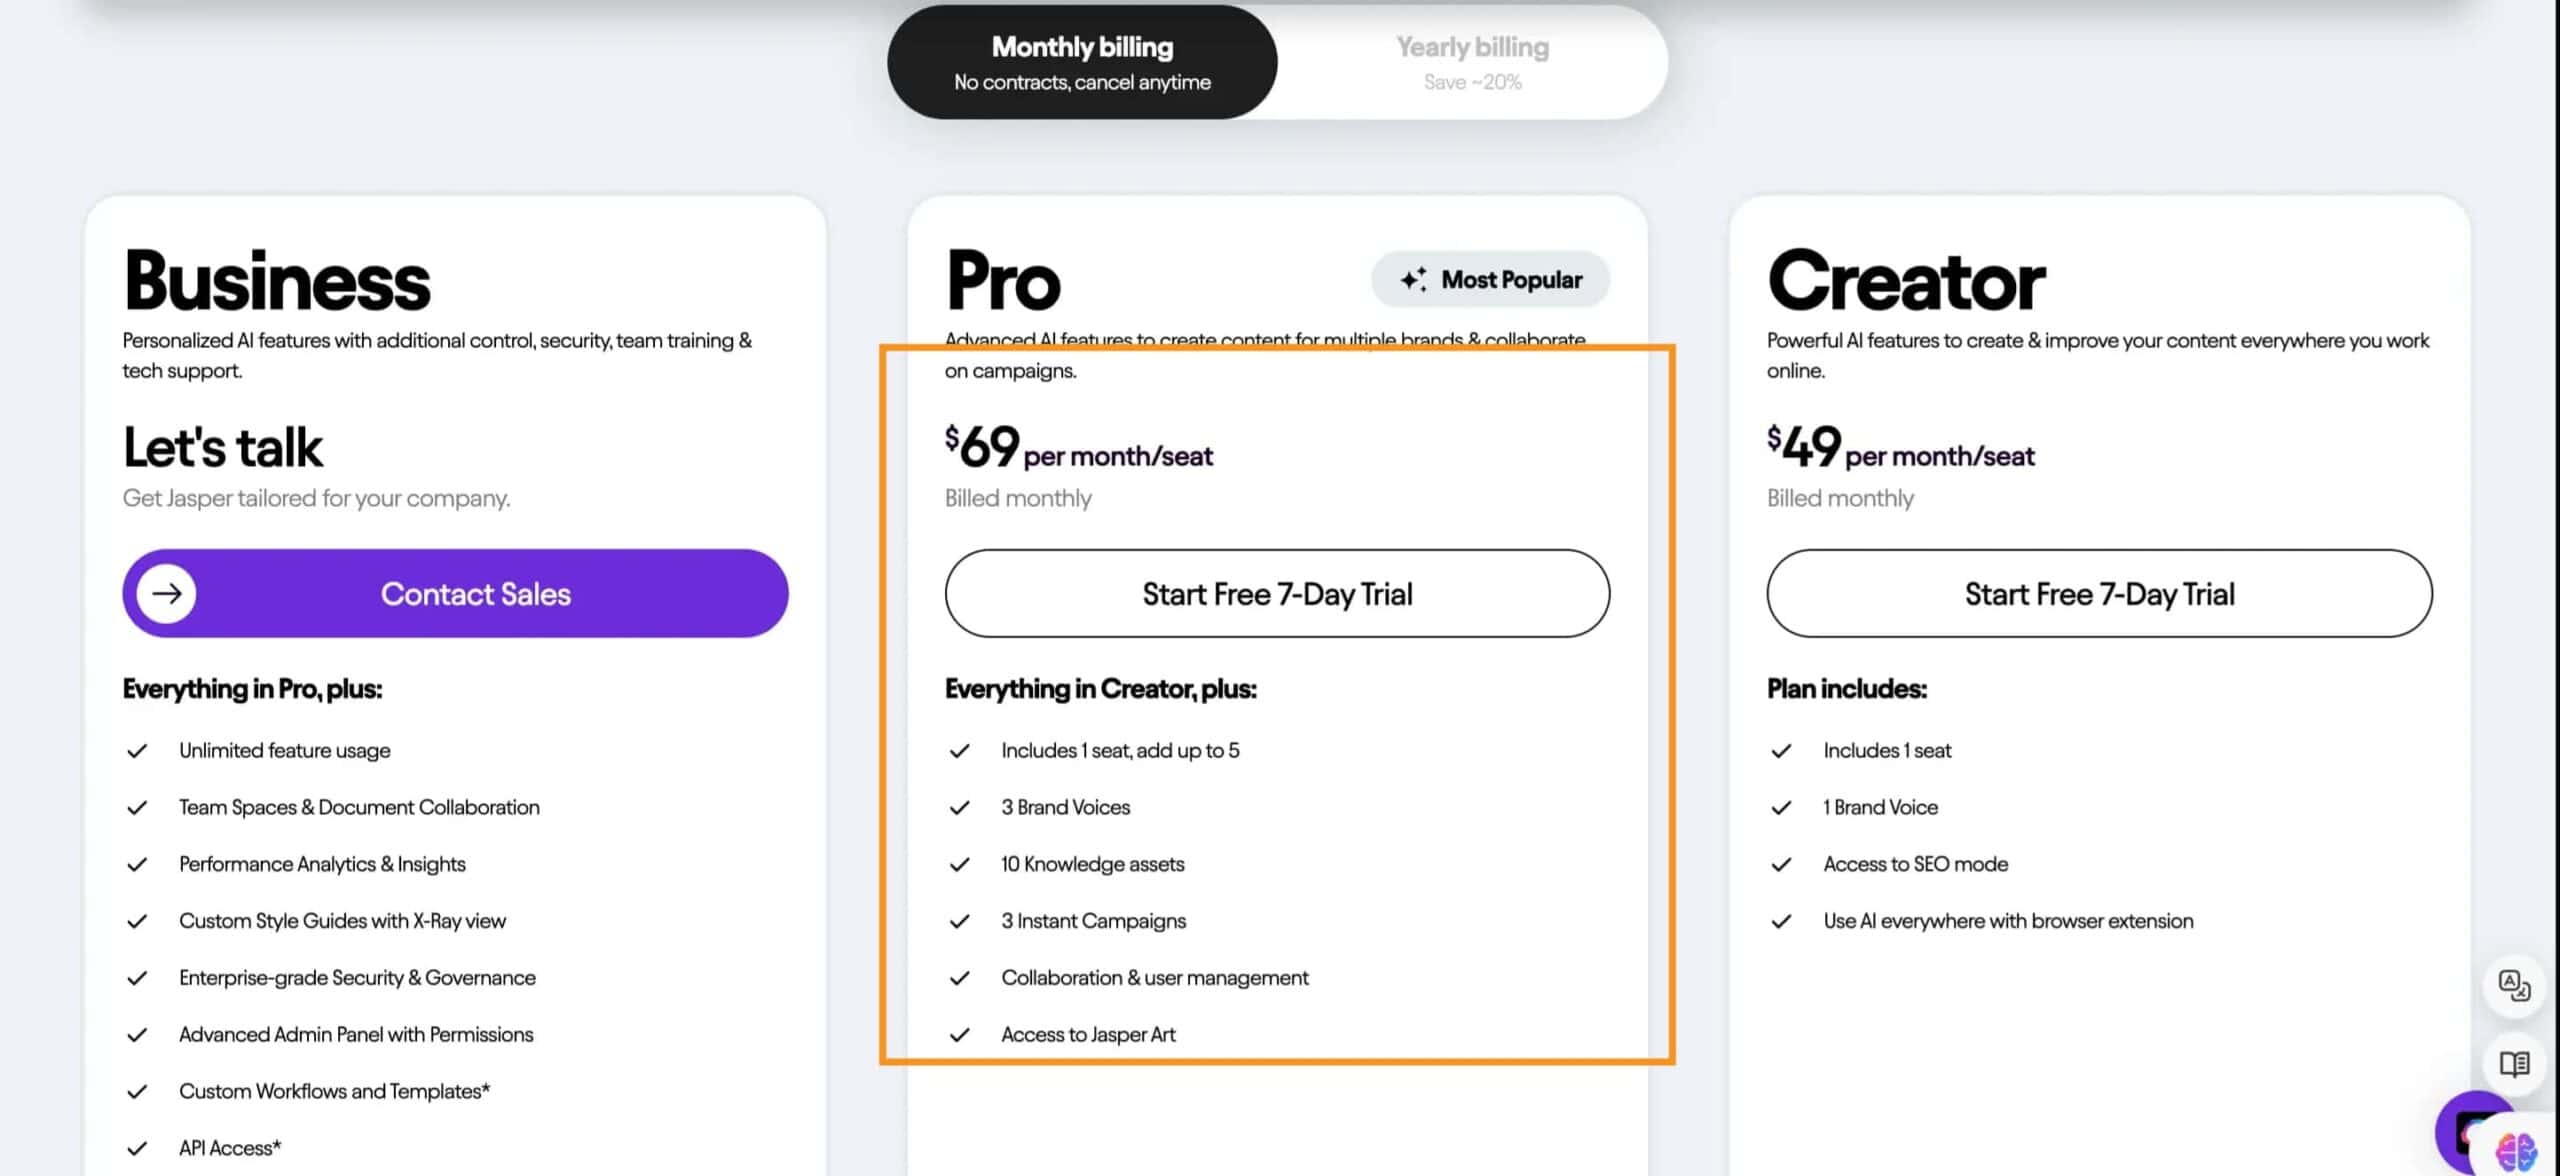
Picking a Jasper AI plan is key to your blog content. I've watched Jasper change a lot. It used to cost $99 a month for the top plan, with limits on how many words you could write.
Now, it's way better. For $69 a month, you get all the pro features without worrying about word counts. That means you can write as much as you need for your blog.
If you're starting out alone, the Creator plan at $49 a month is good. It's simple and made for one blogger. It doesn't have chat or art, but it's enough to get going.
But if you look at what you get, the Pro plan is worth it. For $20 more, you get everything in one place.
There is no need to find other tools for generating featured images and chat assistants when you hit a creative block.
The good news is that there's a 7-day free trial to see if it fits what you need.
2. Connect your Jasper With Surfer SEO to optimize your article for SEO
For those who don't know, Surfer SEO is a tool that helps you optimize your blog posts to rank higher by analyzing key on-page factors and providing actionable recommendations.
And when you combine it with Jasper, you've got a powerhouse duo for your content creation. Here's how to get them working together.
First, you'll want to turn on the SEO features in Jasper.
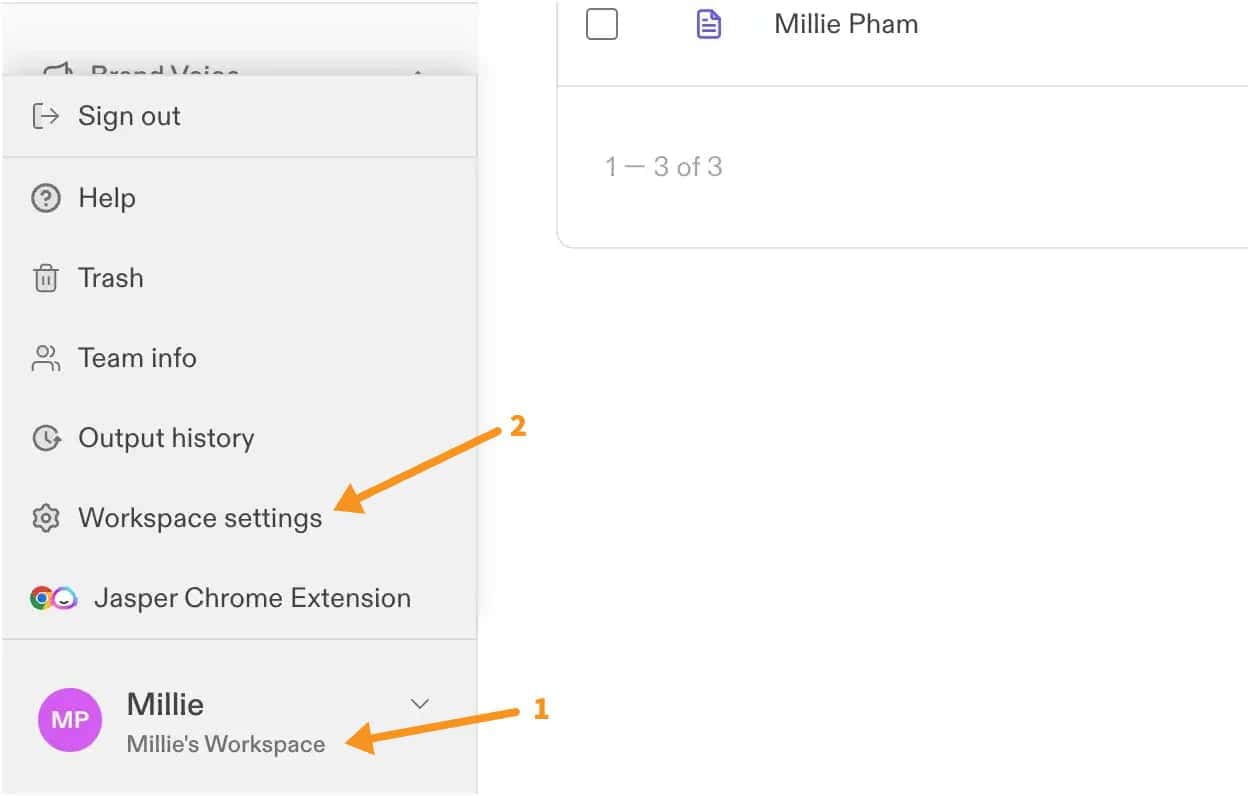
Click on your name in the bottom left corner, then go to "Workspace settings" and click on "Integrations."
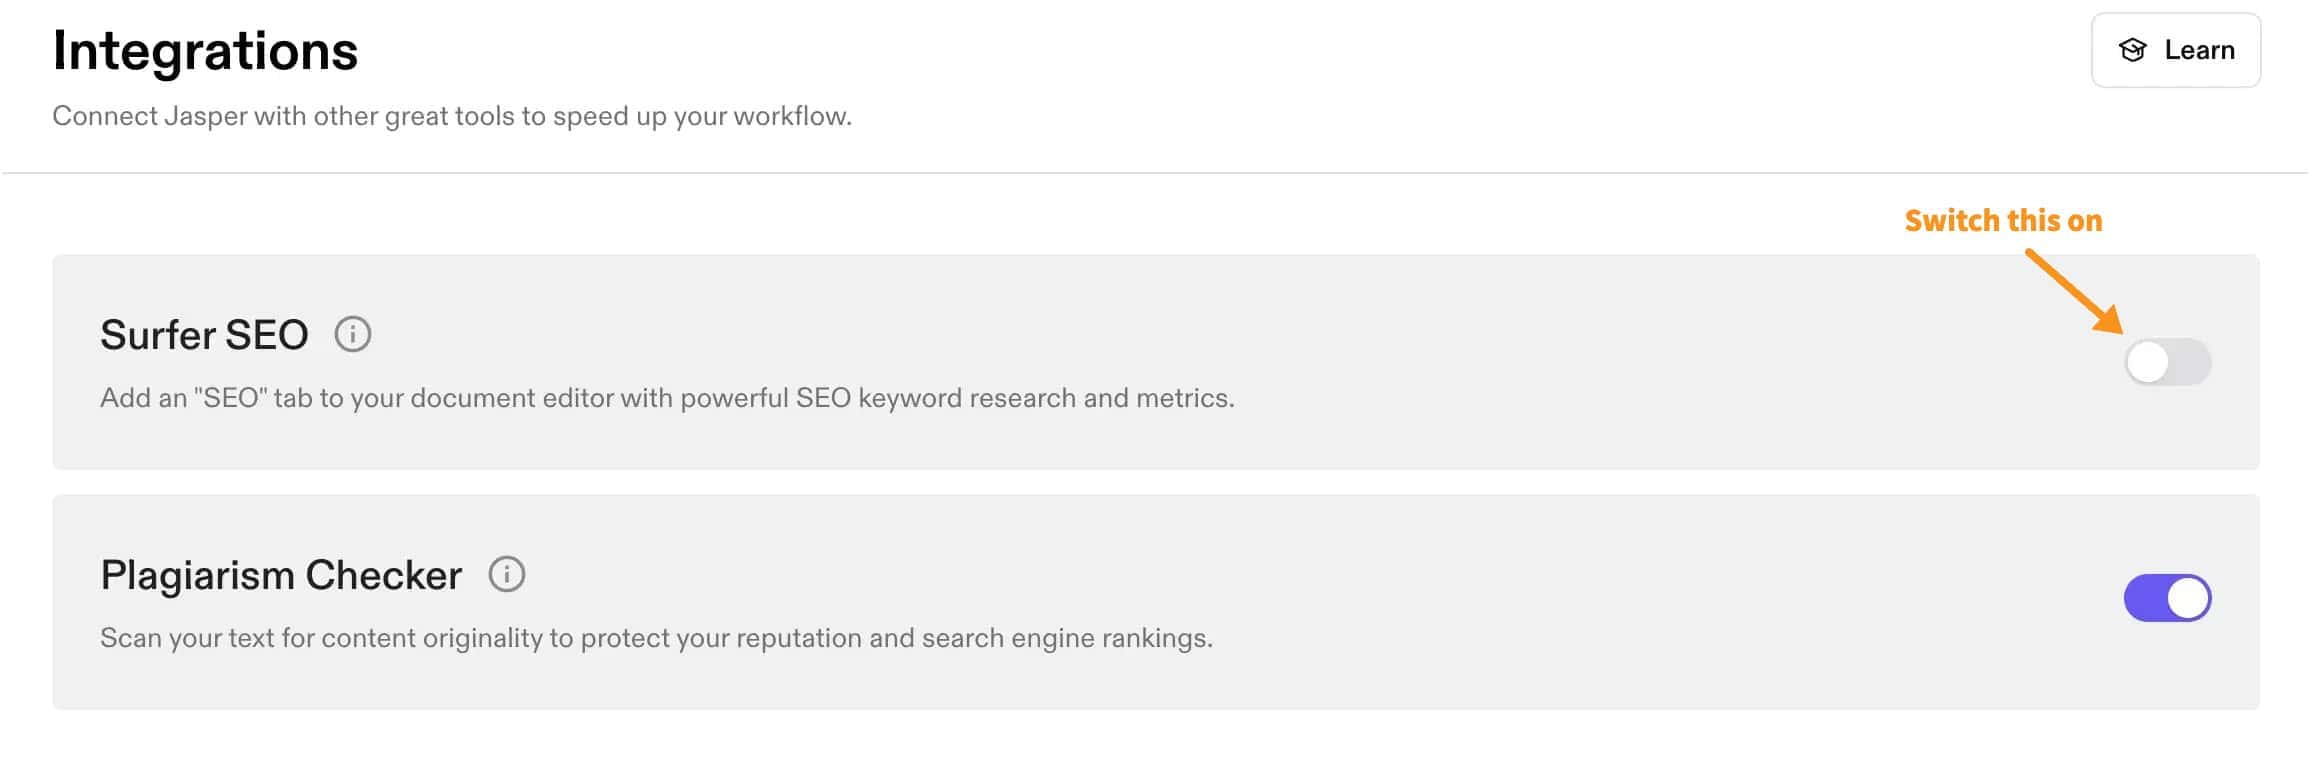
Here, you'll see the option for Surfer SEO. Toggle it on, and the button will light up purple.
Before you go any further, make sure you're logged into your Surfer SEO account.
If you're not, just open a new tab in the same browser, log in there, and keep it open.
Next, open up a new document in Jasper or pick up an existing one.
Lastly, on the left side, you'll find the SEO panel icon. Clicking this will open the Surfer SEO dashboard right inside Jasper.
3. Choose One of the Jasper Blog Post Templates
Jasper offers five different templates, each tailored to a specific type of blog content.
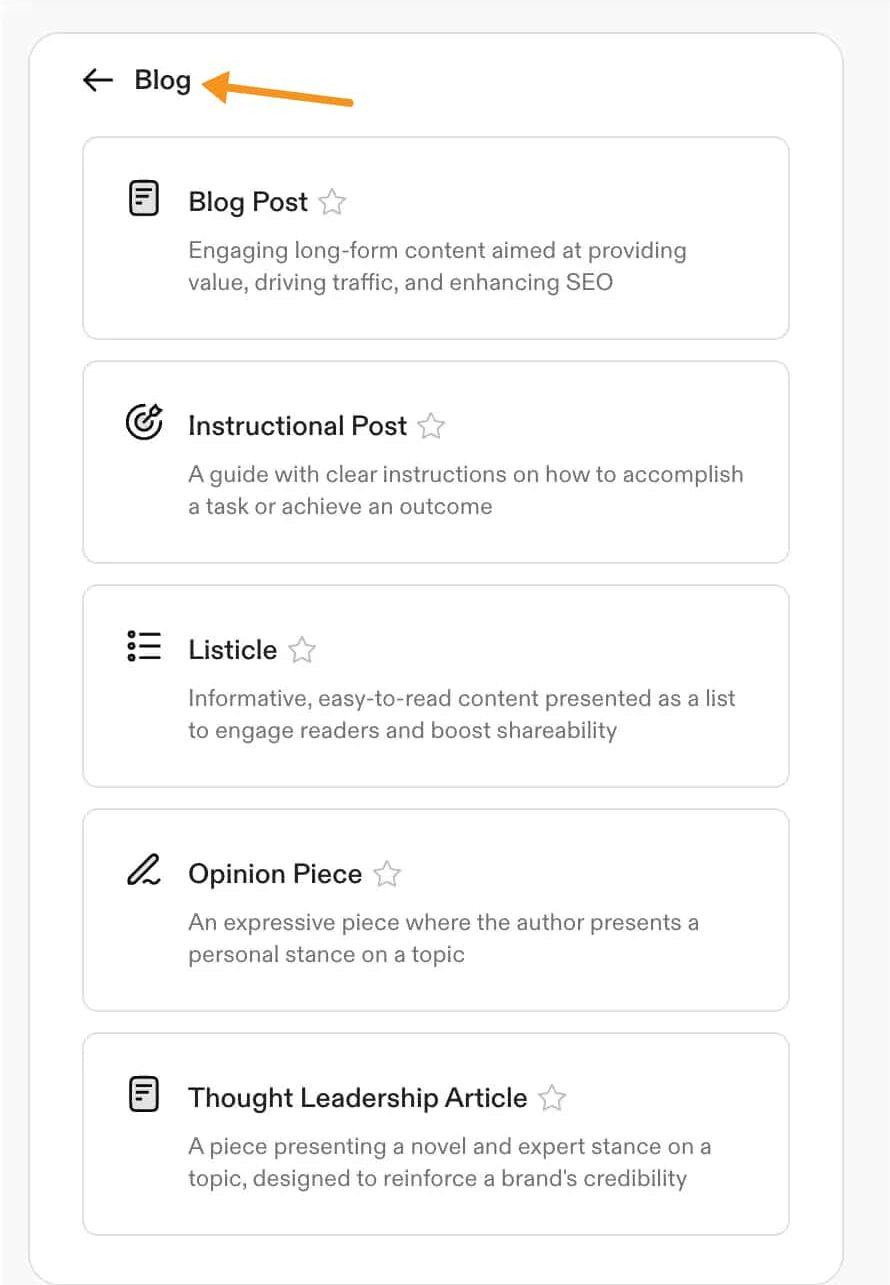
- The 'Blog Post' template is perfect for creating engaging, long-form content designed to provide value, drive traffic, and enhance your SEO efforts.
- If you're looking to teach your readers how to do something, the 'Instructional Post' template gives you a structured format to deliver clear, step-by-step instructions.
- For content that's easy to skim and highly shareable, the 'Listicle' template helps you organize your information into a compelling list format.
- When you want to share your personal viewpoint, the 'Opinion Piece' template allows you to express your stance on a topic passionately.
- If you want to establish yourself as an authority in your field, the 'Thought Leadership Article' template helps you create a piece that presents innovative ideas and bolsters your brand's credibility.
Choose one of these Jasper blog post templates, and you're already on your way to creating content that resonates with your audience.
4. Select a Brand Voice

Jasper's brand voice feature is a big help here. It teaches Jasper to talk just like you or your brand.
So, if you're all about being friendly, cracking jokes, or keeping things strictly professional, Jasper can learn that from you.
How? It's easy. Just give Jasper some of your own writing. You can upload documents or direct them to your blog. Once Jasper sees how you write, it'll start to catch on.
This is really useful because it keeps your style the same across everything you write, whether it's blog posts, emails, or even your social media updates.
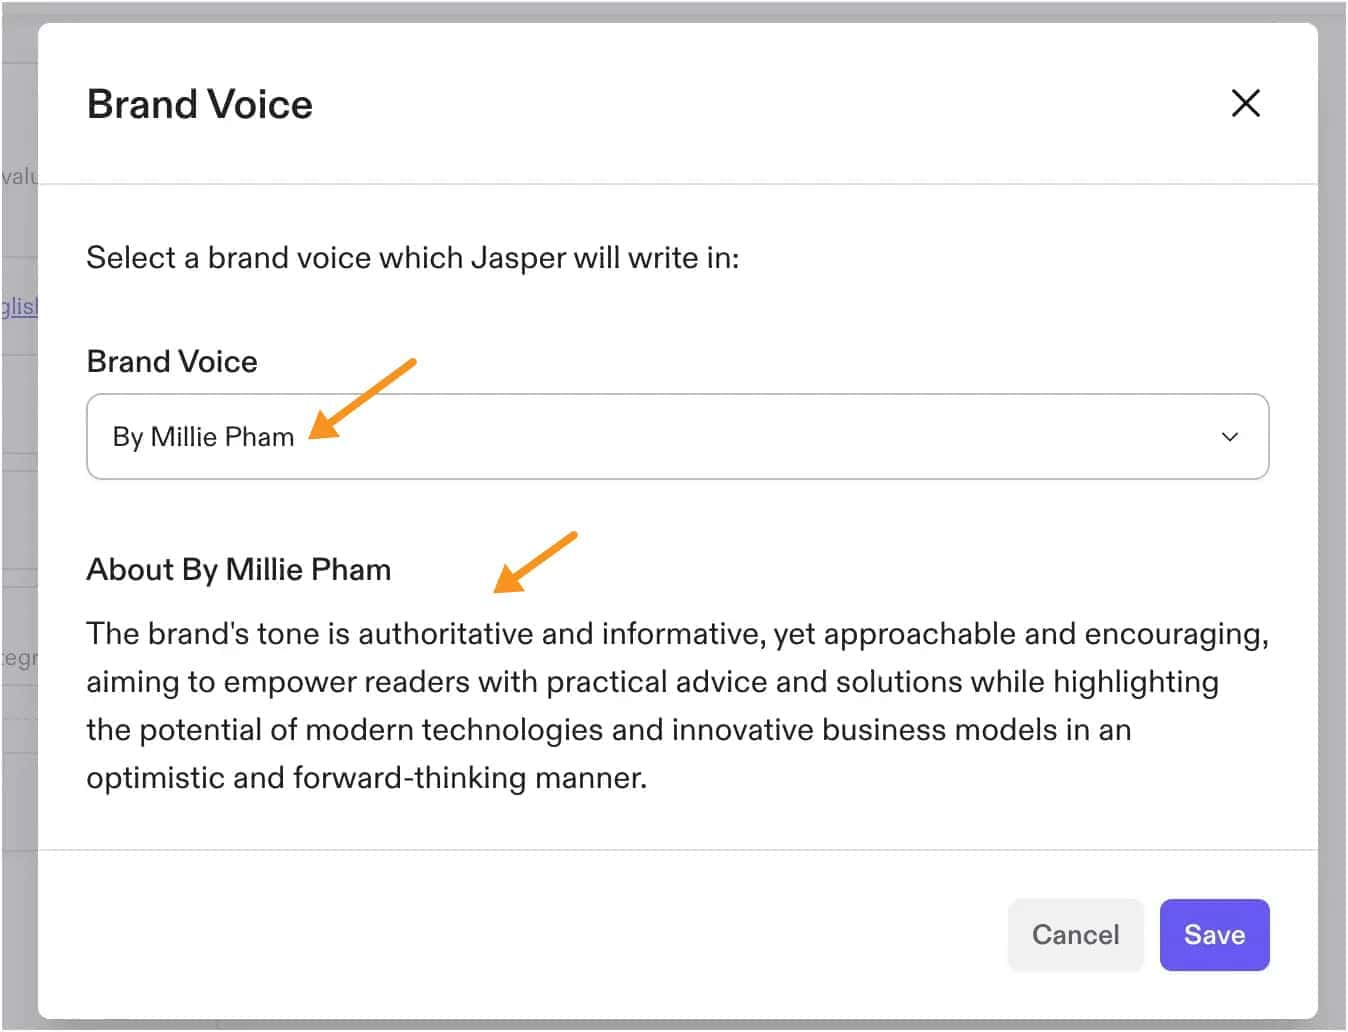
When everything you write sounds like you, it keeps things genuine. Your audience will feel more connected to what makes your brand special.
And whenever you're bursting with new ideas or need Jasper to draft something up, it'll sound just like it came from you.
5. Workflow to Create a new blog post

Now, with the basics covered, it's time to roll up your sleeves and start the content creation process.
Here's a step-by-step workflow that leverages Jasper AI to create a polished blog post from start to finish.
Describe the main topic of your article
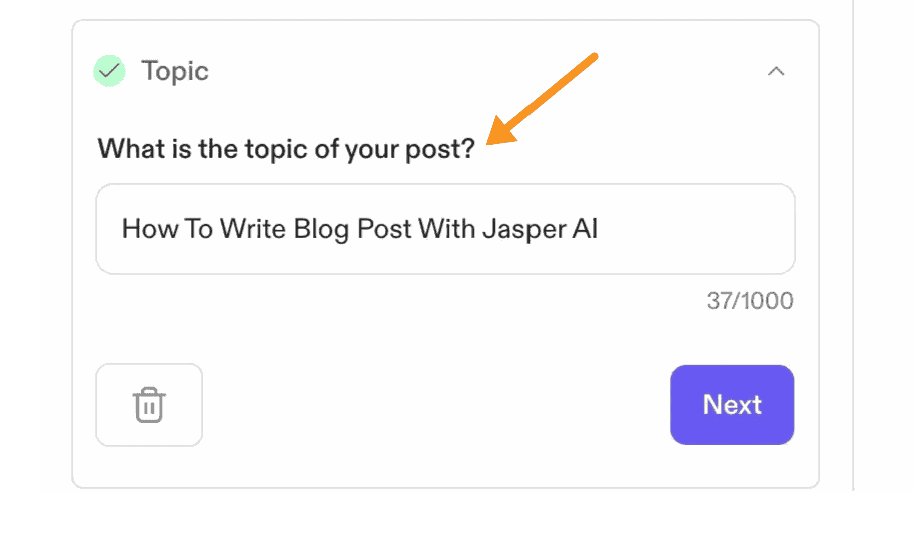
Begin by clearly defining the main topic of your article. This can be your blog post title.
For this example, I'll go with "How to Write a Blog Post With Jasper AI."
Describe your audience

Next, it's important to identify your target audience. Who will benefit from reading this blog post?
If you're not immediately sure who your audience is, that's perfectly fine. Depending on your topic, Jasper can offer suggestions, and you can select the ones that best fit your content.
Create a Detailed Blog Post Outline
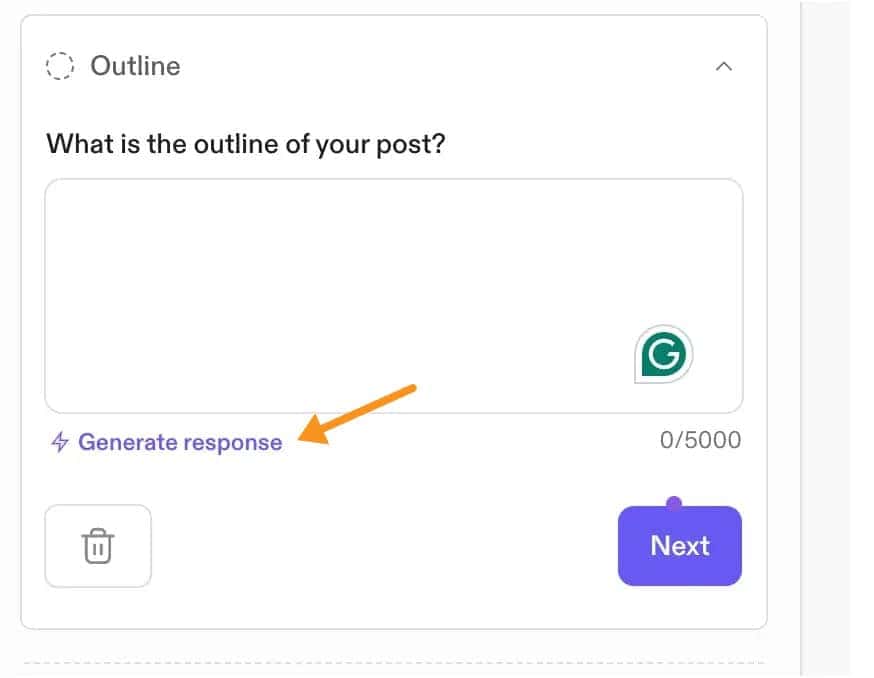
If you are not sure what to start with, just click the "Generate Response" button, and Jasper can generate a blog post outline for you.
Here's the blog post outline that Jasper created for me:
1. Introduction to Jasper AI: What is it and how it's revolutionizing content creation.
2. Understanding the Importance of Quality Blog Posts for SEO and Engagement.
3. Step-by-Step Guide to Writing a Blog Post with Jasper AI:
- Setting Up Your Jasper AI Account
- Choosing the Right Topic and Keywords
- Crafting a Compelling Introduction
- Using Jasper AI to Generate Content Ideas and Outlines
- Writing the Body of Your Post with Jasper AI
- Perfecting Your Post with Jasper AI's Editing and SEO Features
4. Tips and Best Practices for Maximizing Jasper AI's Potential in Blog Writing.
5. Real User Case Studies and Results: How Jasper AI Improved Content Quality and SEO.
6. Conclusion: The Future of Content Creation with Jasper AI and Final Tips for Bloggers.
7. Call-to-Action: Encouraging Readers to Try Jasper AI for Their Next
Of course, you can also use the command feature to create a detailed outline for your blog post and then copy and paste it into this section.
From my experience, this method often results in a more detailed outline.
So, for example, say the title of your blog post is “How To Write Blog Post With Jasper AI.”

You can type a Jasper Command such as “Write a detailed outline for a blog post titled How To Write Blog Post With Jasper AI"
Here’s what Jasper created for me:
Outline for "How To Write a Blog Post With Jasper AI in X Steps"
Introduction
- Brief overview of the importance of quality blog posts in digital marketing
- Introduction to Jasper AI as a tool for content creation
Step 1: Define Your Blog Post Goal
- Identifying the purpose of your blog post
- Setting clear objectives
Step 2: Understand Your Audience
- Analyzing your target demographic
- Tailoring content to meet audience needs
Step 3: Choose Your Blog Post Topic
- Utilizing Jasper AI to generate topic ideas
- Finalizing a topic that aligns with your goals and audience interests
Step 4: Create a Detailed Outline
- Breaking down the post structure
- Using Jasper AI to craft an engaging outline
Step 5: Write the First Draft With Jasper AI
- Initiating the content creation process with Jasper
- Tips for effective collaboration with AI technology
Step 6: Enhance Your Draft
- Refining and enriching the content
- How to use Jasper AI for adding depth and detail
Step 7: Optimize for SEO
- Leveraging Jasper AI for keyword integration and SEO enhancement
Step 8: Edit and Proofread
- The importance of human oversight
- Finalizing your blog post for publication
Step 9: Prepare for Publishing
- Formatting and adding multimedia elements
- Preparing metadata for SEO
Step 10: Publish and Promote Your Blog Post
- Strategies for effective distribution and promotion
- Encouraging engagement and measuring success
Conclusion
- Recap of the steps to create a blog post with Jasper AI
- Encouraging readers to experiment with Jasper AI in their content creation process
Call-to-Action
- Invite readers to try Jasper AI
- Suggest signing up for a webinar or tutorial on using Jasper AI for content creation
6. Write the First Draft With Jasper AI
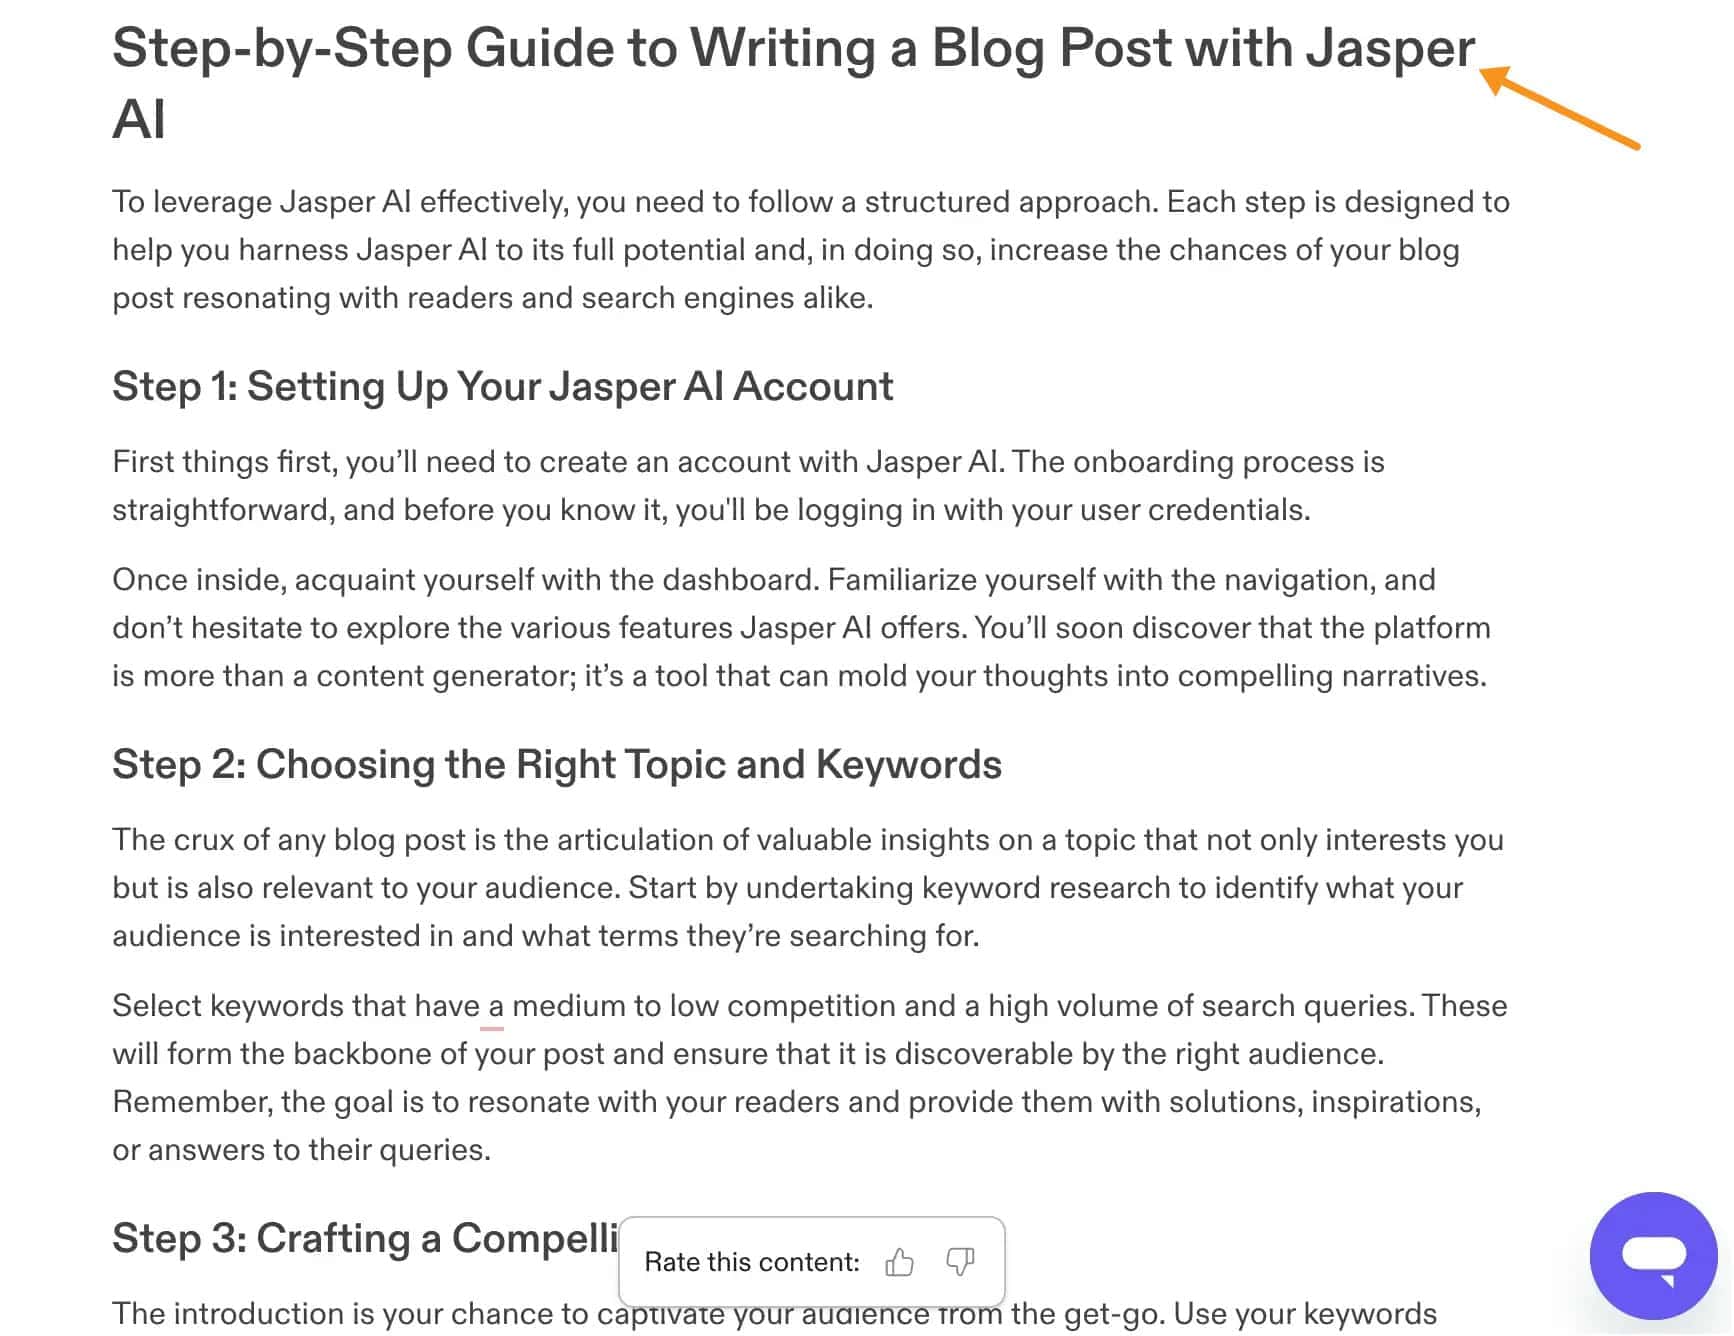
After you've added all the details and set the stage, there's just one simple step left: click "generate." That's it!
Jasper will take your input and turn it into a blog post with an intro, body, and conclusion.
7. Use Jasper Command And Jasper Chat To Add More Details
As you can see, the first draft seems not to be really in-depth, so we need to dive deeper to flesh out the content.
That's where Jasper Command and Jasper Chat come into play.
With Jasper Command, you can give clear instructions to create content that fits your needs.
Just tell Jasper what to do, how to structure it, and any specific details you want included.
For example, you might say, "Write a paragraph about the image tips to help your website run faster in bullet point."

Jasper will then craft content that matches your request.
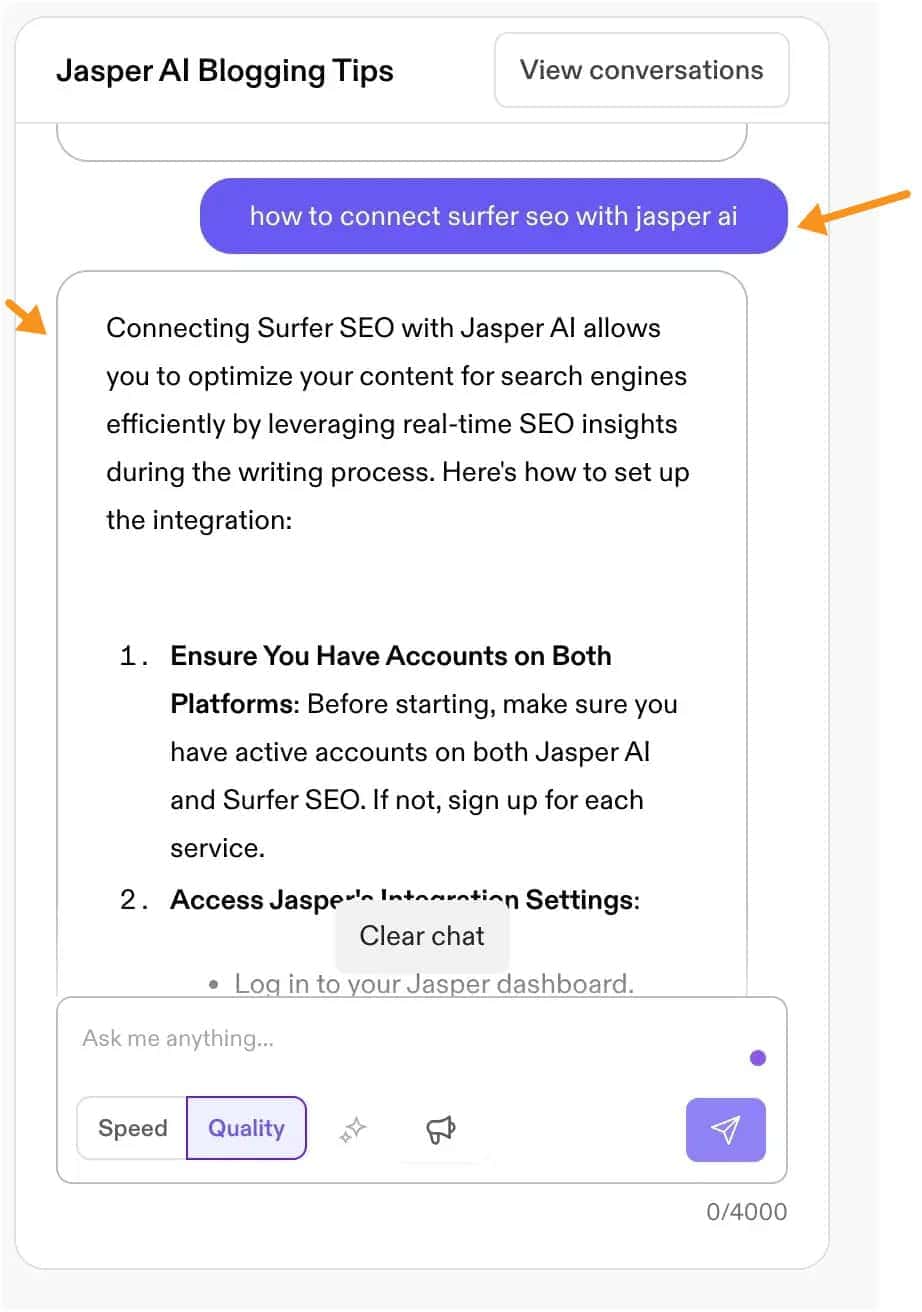
Jasper Chat, on the other hand, is like ChatGPT that's built right in your Jasper workspace.
You can ask questions, get clarifications, and refine your ideas in a more interactive way.
You might ask, "How to connect Jasper AI to Surfer SEO?" and Jasper Chat will engage with you to provide helpful suggestions and even expand on the topic with insightful details.
Both tools are designed to make the process of creating content smoother and more intuitive.
Whether you need a structured approach with Jasper Command or a more conversational touch with Jasper Chat, you have the flexibility to create content that resonates with your audience and feels genuinely human.
8. Check Your Grammar
To catch these errors, you can use automated tools like Grammarly Chrome Extension, which can spot common grammar and spelling mistakes for you.
However, don't rely solely on software; take the time to read your post out loud.
This can help you catch awkward phrasing or repeated words that you might have missed on the first go-around.
Also, pay attention to punctuation—proper use of commas and periods can make your writing clearer and easier to understand.
Remember, a post that's free of errors reflects the effort and care you've put into your writing, and it makes a better impression on your audience.
9. Move to WordPress
Once your content is polished, it's time to move it into your Content Management System (CMS).
If you're using WordPress, ensure that the formatting aligns with your blog's design.
Moving your content to WordPress is a straightforward process. Start by copying your final text. Then, in your WordPress dashboard, create a new post and paste your content into the editor.
10. Add Images
After pasting your article to WordPress, here you can adjust headings, add links, and insert images to make your post visually appealing.
Don't forget to fill in the SEO title and meta description to help your post rank better in search results.
Image Optimization Tips for Faster Website Performance
- Compress Images: Use tools like ShortPixel to make your images smaller without losing how good they look. This helps your pages load quicker.
- Pick the Right Image Format: If your photo has lots of colors, go with JPEG. Use PNG for pictures that need to be clear, like logos. WebP is a great choice for both because it keeps the quality high but the size low.
- Make Images Responsive: This means the images will adjust to look good on any device, whether it's a phone or a computer. It also helps pages load faster because it doesn't use more data than needed.
- Try Lazy Loading: With lazy loading, pictures only load when you need them. So, if the image isn't on the screen right away, it won't load until you scroll down to it. This makes the first page load faster.
- Size Images Correctly: Make sure your images are not bigger than they need to be for your site. Bigger images take longer to load.
- Use Image CDNs: CDNs keep your images on servers all over the place, so they get to your visitors faster, no matter where they are.
- Enable Caching: When you turn on caching, people who come back to your site can load images from their own computer instead of the internet, which makes everything load faster.
11. Analyze Blog Posts With RankMath
When you've got your blog post ready to go, it's smart to give it a quick check-up with RankMath before you share it with the world.
RankMath is a WordPress plugin that scores your content on a scale of 0 to 100 and helps you see how well your post is set up for search engines.
It looks at your post and gives you tips on how to make it even better so more people can find it.
You just need to look at the suggestions RankMath offers, like adding keywords or improving your sentences, and make some tweaks.
I always aim for 80+/100.
It's pretty simple, and it can really help your post get noticed by more readers.
12. Publish Your Blog Post
Publishing your blog post is the final step in sharing your thoughts with the world. Once you're happy with your writing, it's time to put it out there.
In WordPress, you'll see a button that says 'Publish.'
It's your green light to go live. Click it, and your post is now online for everyone to read. But before you do, double-check everything. Look over your title, make sure your images are in place, and your paragraphs are neat.
After you've given it the once-over and everything looks good, take a deep breath and hit publish.
Congratulations, you've just added your own unique voice to the internet!
Final Thoughts
Wrapping up, I hope that this guide on how to write blog post with Jasper AI has will equip you with the tools to streamline your blog post writing process.
By following these steps, you can create engaging and well-structured blog posts that capture your audience's attention.
Remember, the blend of Jasper AI's assistance and your personal touch is the secret to compelling blog content.
If you're curious to see how Jasper AI can transform your writing, why not give it a try?
Sign up for a 7-day trial and take the first step towards easier and more efficient blog writing.

