Are you a video editor just starting out and looking for a way to make money online? Do you need tips to help you navigate the editing process? Look no further! In this post, I’ll share 13 video editing tips for beginners that will help take your videos to the next level in 2023 and beyond.
As someone who has spent countless hours editing videos for various projects, I understand the struggles that come with the territory. That’s why I’m excited to share with you some of the tips and tricks I’ve picked up along the way.
So, grab a cup of coffee and get ready to dive into the world of video editing. These tips are practical, easy to implement, and will definitely help you step up your game.
Best Video Editing Tips For Beginners: 13 Things You Should Know
If you’re new to video editing, getting started can feel daunting. Where do you begin? In this section, I’ve got you covered with 12 essential video editing tips that every beginner should know.
From basic techniques to more advanced tricks, these tips will help you take your videos to the next level. Whether you’re creating videos for personal projects or for business purposes, the following tips will help you get started on the right foot.
So, let’s dive in and discover how to create videos that truly stand out!
1. Choose The Right Video Editing Software
Choosing the right video editing software is one of the most important decisions you’ll make as a video editor.
With so many options available, knowing which one is right for you can be overwhelming. If you’re creating professional-looking YouTube videos, Adobe Premiere Pro or Final Cut Pro might be good options to consider.
Both are powerful tools with a wide range of features for editing videos. However, keep in mind that these programs require a powerful computer and can be expensive.
If you’re just starting out and don’t have access to a powerful computer, simpler editing software such as iMovie or DaVinci Resolve can be a great choice.
These programs offer basic editing features and are perfect for beginners. Ultimately, the choice of editing software will depend on your needs, budget, and level of experience. So, take your time to research your options and choose the one that’s right for you.
2. Plan Your Story Before You Edit
Planning your story before you start editing is essential for creating a cohesive and engaging video. As a video editor, reviewing your footage and identifying the key elements you want to include in your video is important.
From there, sketch a rough storyboard with key shots and transitions you want to use. This will help you visualize your story and ensure you have all the footage you need before editing.
Most video editing software offers a range of tools to help you tell your story but remember that even the most advanced editing software can’t compensate for a poorly planned story.
So, take the time to plan your story before you start editing, and you’ll end up with a video that captivates and engages your audience.
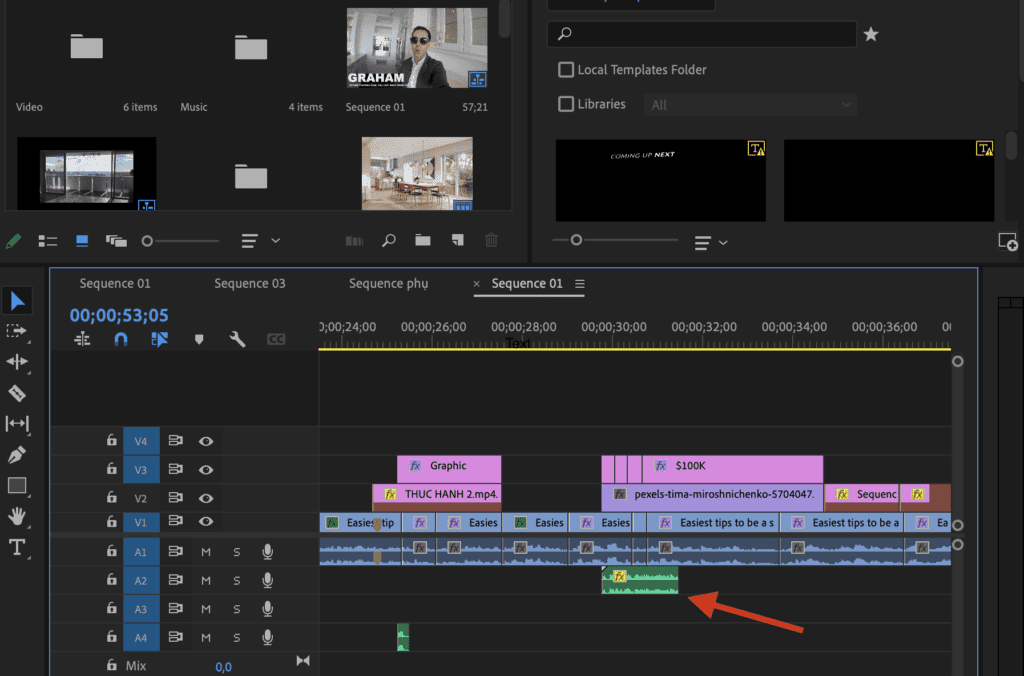
3. Organize your footage
Organizing your footage is a crucial step in the video editing process. Before you start editing, it’s important to take the time to sort and label your clips to save time in the long run.
One effective way to organize your footage is to create separate folders for photos, music, and video clips. This will help you easily find the specific files you need and speed up your editing process.
Additionally, consider labeling your clips with different colors to make it easy to identify them when you’re scrolling through your timeline.
4. Use transitions sparingly
When editing a video, adding flashy transitions between every clip can be tempting. However, it’s important to use transitions sparingly and purposefully.
While transitions can be useful for indicating a change in time, location, or mood, using too many of them can make your video look amateurish and distract from the content itself.
Instead, focus on the content and let the transitions serve as subtle enhancements to the overall flow of the video. Remember, the goal of video editing is to create a cohesive and engaging story, so use transitions thoughtfully to support that goal.
5. Pay Attention To Audio
While it’s easy to get caught up in the visual aspects of video editing, it’s important not to overlook the importance of good audio. In fact, audio quality can make or break a video, especially for YouTube videos or in industries where sound is critical, such as music or film.
To ensure that your audio is up to par, you can use sound effects and music that complement your footage and enhance the viewing experience. This can include anything from ambient noise to music tracks and can help set the mood and tone of your video.
However, ensuring that your sound effects and music don’t overpower your dialogue or other important audio elements is important.
One tip is to use the audio levels in your editing software to adjust the volume of different tracks and ensure a good balance.
By paying attention to both the technical and creative aspects of audio in video editing, you can create high-quality videos that capture and hold your audience’s attention.
6. Use Jump Cuts
Do you ever find yourself watching a video that seems to drag on forever? That’s where jump cuts come in handy.
They’re a video editing technique that can help you keep your content snappy and engaging, especially if you’re dealing with long or potentially boring footage.
Essentially, a jump cut involves removing a section of a clip and joining the remaining parts together to create a seamless edit.
You can use this technique to condense long footage, eliminate awkward pauses or transitions, or simply keep your video moving at a good pace.
However, it’s essential to be mindful of the frequency of jump cuts in your video. Overusing jump cuts can cause your video to appear disjointed and unsettling for your viewers. However, if used moderately, jump cuts can effectively make your content more enjoyable to watch.
7. Color-correct your footage
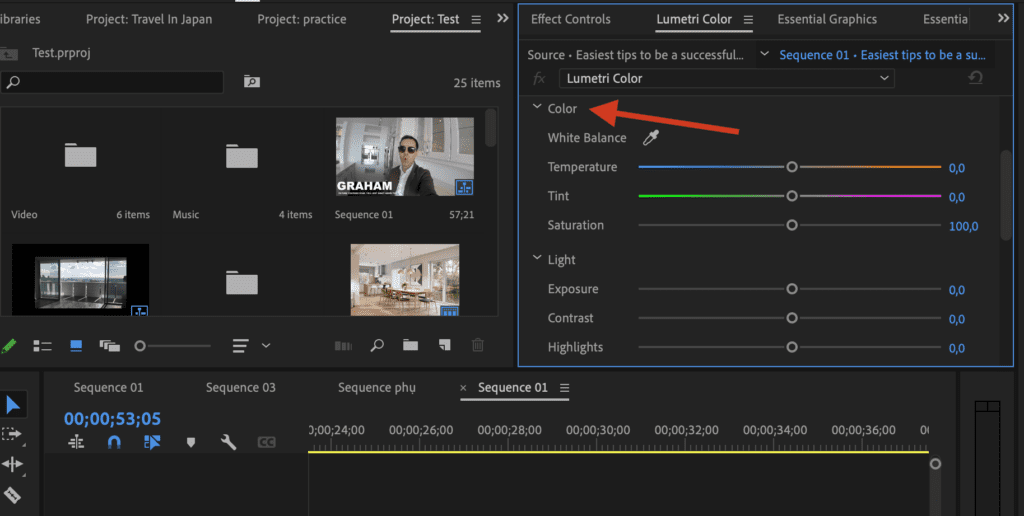
Color-correcting your footage is essential to creating the right mood and tone for your video. Adjusting the colors can make your footage look more polished and professional.
Before you start color-correcting, it’s important to ensure that your footage is properly exposed and white-balanced.
Once you have a good base, you can use color-grading tools to create the look and feel you want. For example, you can use warm colors like yellow and orange to create a cozy atmosphere or cool colors like blue and green to create a more calm and serene mood.
With a little practice, you’ll be amazed at how much of a difference color correction can make in creating the perfect scene.
8. Take Advantage Of Two Or More Sequences
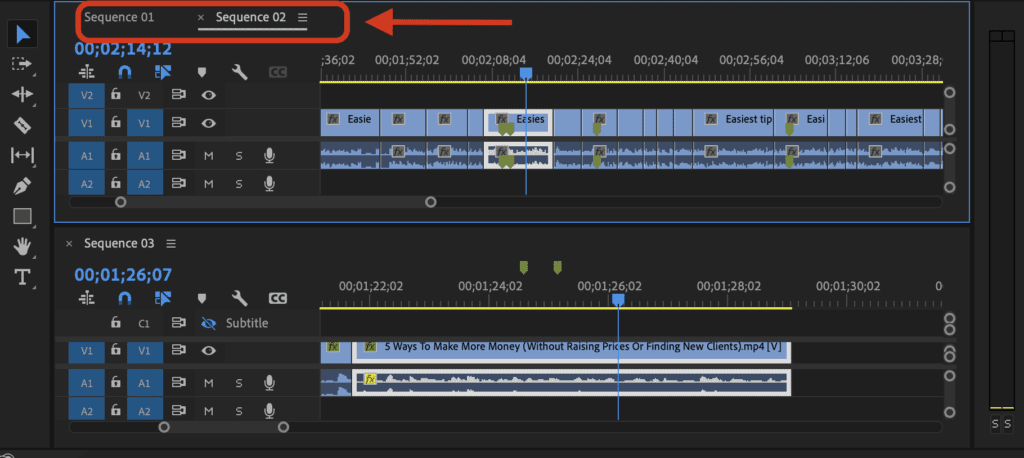
When editing longer videos, it’s easy to lose track of your progress and the footage you need. But using multiple sequences can help you stay organized and efficient.
You can create a separate sequence for each scene, then cut and choose the best footage on one sequence and drag it to another.
This way, you can easily match the footage’s speed and timing, making it easier to navigate your timeline and keep track of your progress. With this simple trick, you can streamline your production process and create high-quality videos in less time.
9. Export In The Right Format
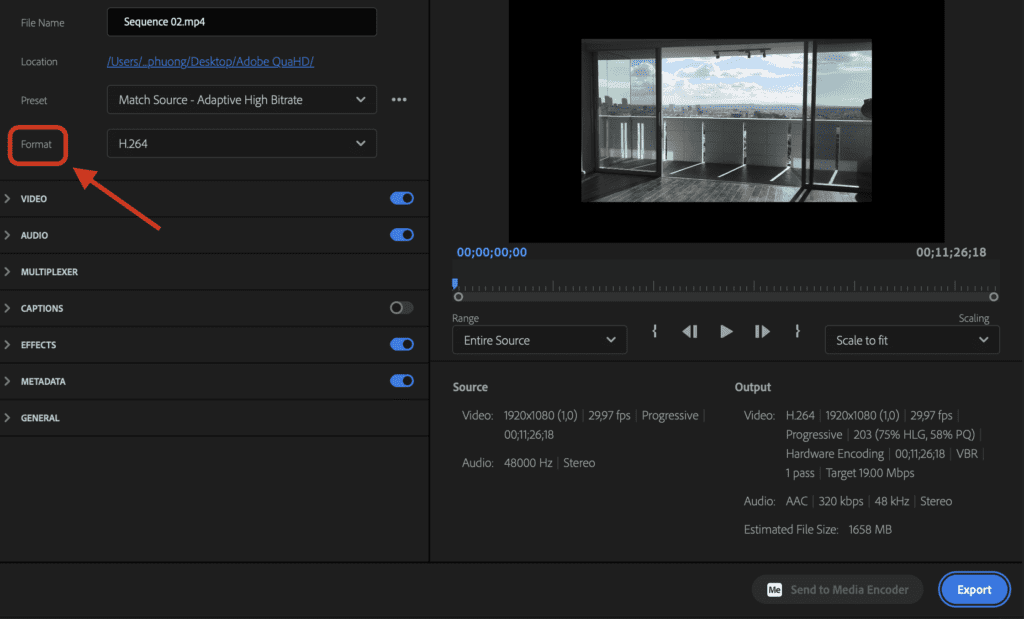
If you plan on uploading your video to YouTube or other online services, it’s important to export it in a compatible format that will play smoothly on the internet. Common formats for online videos include MP4, MOV, and WMV.
You also want to consider the resolution and aspect ratio of your video. YouTube recommends using a resolution of 1080p or higher for the best quality and an aspect ratio of 16:9 for widescreen videos.
Exporting your video in the right format will ensure that your audience can watch it without any technical issues and improve the overall quality of your content.
So, take some time to research the best format for your video, and make sure to choose the right options when exporting.
10. Use Speedramps
Speed ramps are a great way to add some creative flair to your videos. This technique involves changing the speed of your footage, creating a slow-motion or fast-motion effect that can add emphasis to a specific moment in your video.
By taking advantage of speed ramps, you can add an extra level of visual interest to your videos and keep your viewers engaged.
11. Shorten Music
When it comes to editing videos, one important aspect to consider is the music you choose. While it’s important to select music that matches the tone and mood of your content, you should also pay attention to its length.
Often, a full-length song might be too long for your video, and you might need to shorten it to fit your timeline.
Instead of just cutting it halfway, you can use the”mix tool” in Adobe Premiere Pro so that the software can analyze the video clip and automatically create cuts at appropriate points based on visual and auditory cues.

This will help to make the transition smoother and prevent abrupt changes in sound that can be jarring for viewers.
12. Use L cuts/ J cuts
L cuts and J cuts are popular techniques used in video editing to transition between different audio clips smoothly. An L cut is when the audio from the current clip continues playing while the video transitions to the next clip.
A J cut is when the audio from the next clip is played before the current clip’s video starts. These cuts are used to match the audio and video in a way that feels natural and seamless.
For instance, if you want to transition to a new scene with a different music track, you can use an L cut to have the music start before the new video footage.
J cuts are also useful when introducing a character or topic before the visuals appear on the screen. Incorporating L cuts and J cuts into your videos can significantly impact your content’s overall flow and storytelling.
13. Use keyframes
Keyframes are essential for any video editor looking to add motion and visual interest to their videos. They allow you to adjust different properties of a clip, such as position, scale, and opacity, over time.
Adding keyframes allows you to create smooth transitions between different states of a clip, such as a slow zoom or a fade-in effect. Keyframes can also be used to add animation to photos, making them move and come to life.
The possibilities are endless when it comes to using keyframes, and they are a great way to add a professional touch to your videos.
So if you want to take your video editing skills to the next level, be sure to master the art of keyframing.
FAQs
Final Thoughts
Congrats on taking the first step toward becoming a skilled video editor! I’m so excited to share these 13 video editing tips for beginners with you, so you can create professional-looking videos that capture your audience’s attention and leave a lasting impression.
Trust me, I know how daunting video editing can seem, but with these tips, you’ll be well on your way to creating amazing content in no time. The key is to practice, experiment, and continually learn new techniques.
Don’t be afraid to make mistakes, and keep pushing yourself to create better and more compelling content.
You got this!